
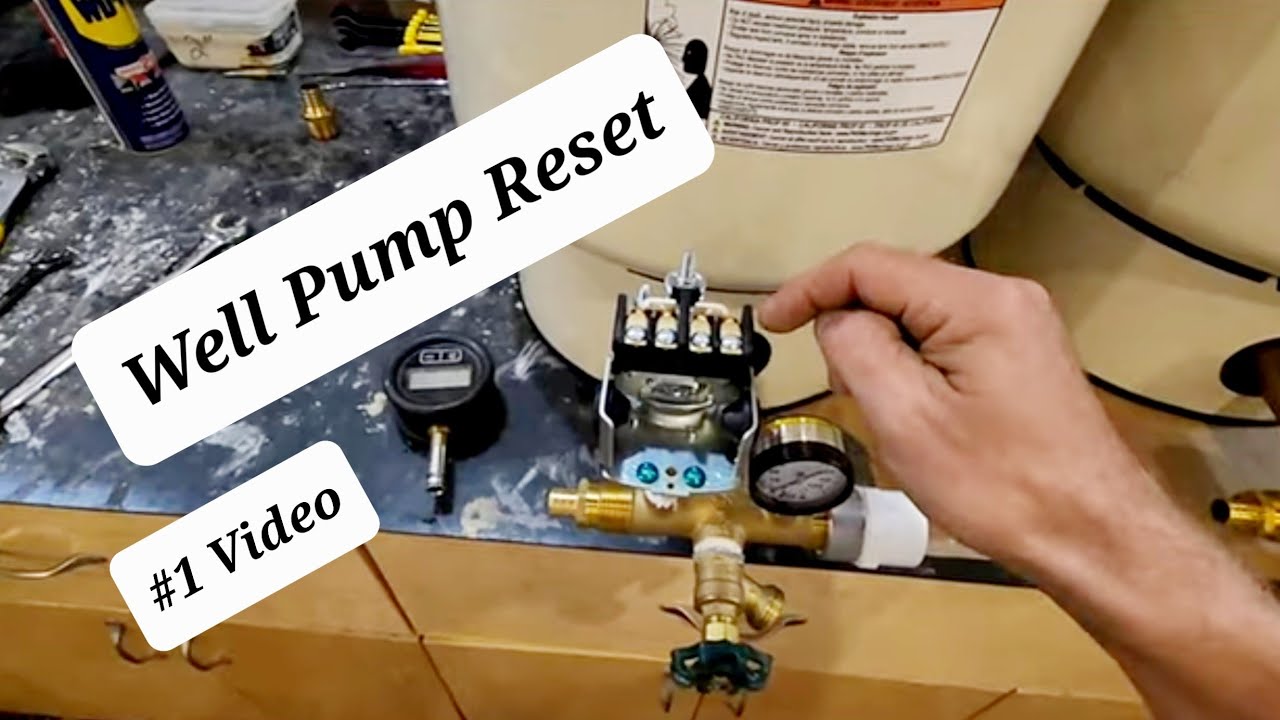
Water well pressure switch troubleshooting finds common switch, wiring, or tank issues fast.
I’ve worked on dozens of private wells and municipal booster systems. This guide on Water Well Pressure Switch Troubleshooting mixes clear steps, hands-on tips, and safety notes. Read on to learn how the switch works, how to spot problems, and how to fix or replace parts with confidence.
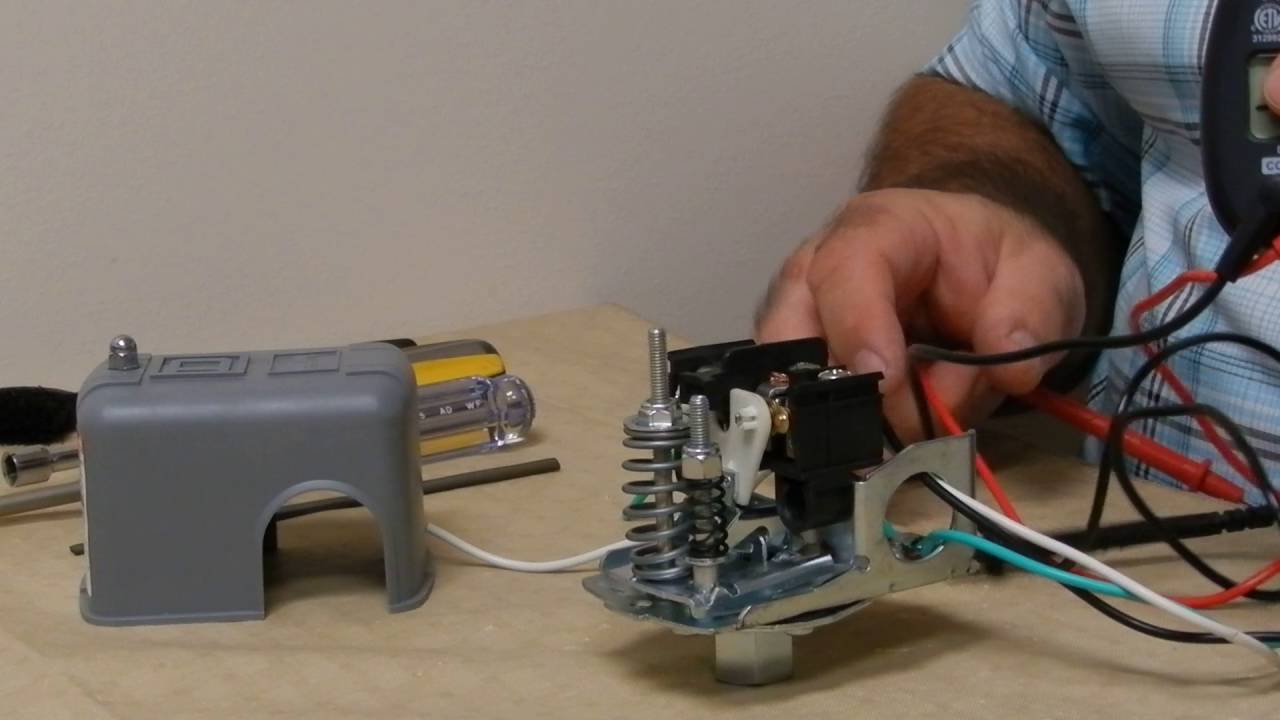
How a pressure switch works and why it matters
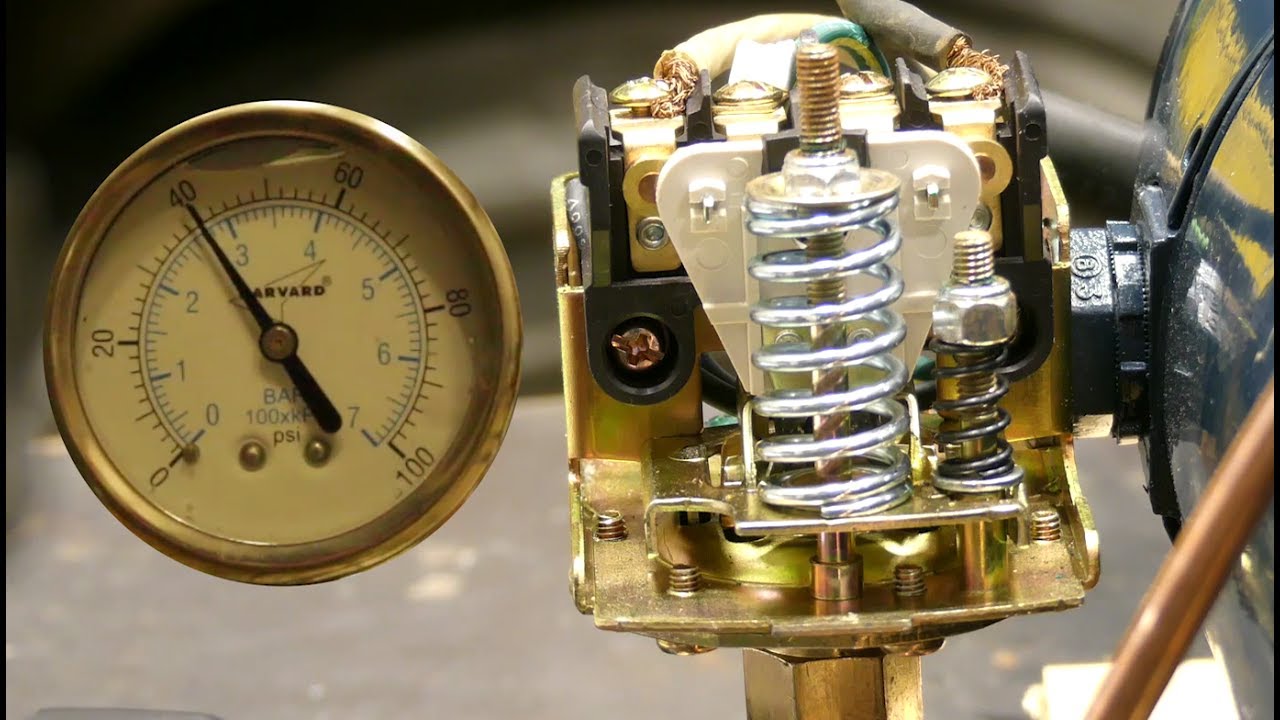
Water Well Pressure Switch Troubleshooting starts with understanding the device. A pressure switch senses the water pressure in the system. It turns the pump on at the cut-in pressure and off at the cut-out pressure. Knowing these basics makes diagnosis faster and safer.
- The switch mounts on the pump or pressure tank. It senses pressure via a small port.
- Common factory settings are 30/50 psi or 40/60 psi.
- The tank’s air charge and switch contacts control run cycles.
Common symptoms and causes
Water Well Pressure Switch Troubleshooting often begins with these symptoms. Seeing the signs lets you narrow the cause quickly.
- Short cycling: Pump turns on and off rapidly. This often points to a bad pressure tank, low air charge, or leaking pipes.
- No pump start: Switch might not get power, have corroded contacts, or be miswired.
- Pump runs but never reaches cut-out: Could be a weak pump, clogged intake, or low voltage.
- Pump won’t stop: Stuck contacts or failed switch mechanism are likely.
- Intermittent operation: Loose wiring, moisture, or debris in the switch can cause this.
Common causes include:
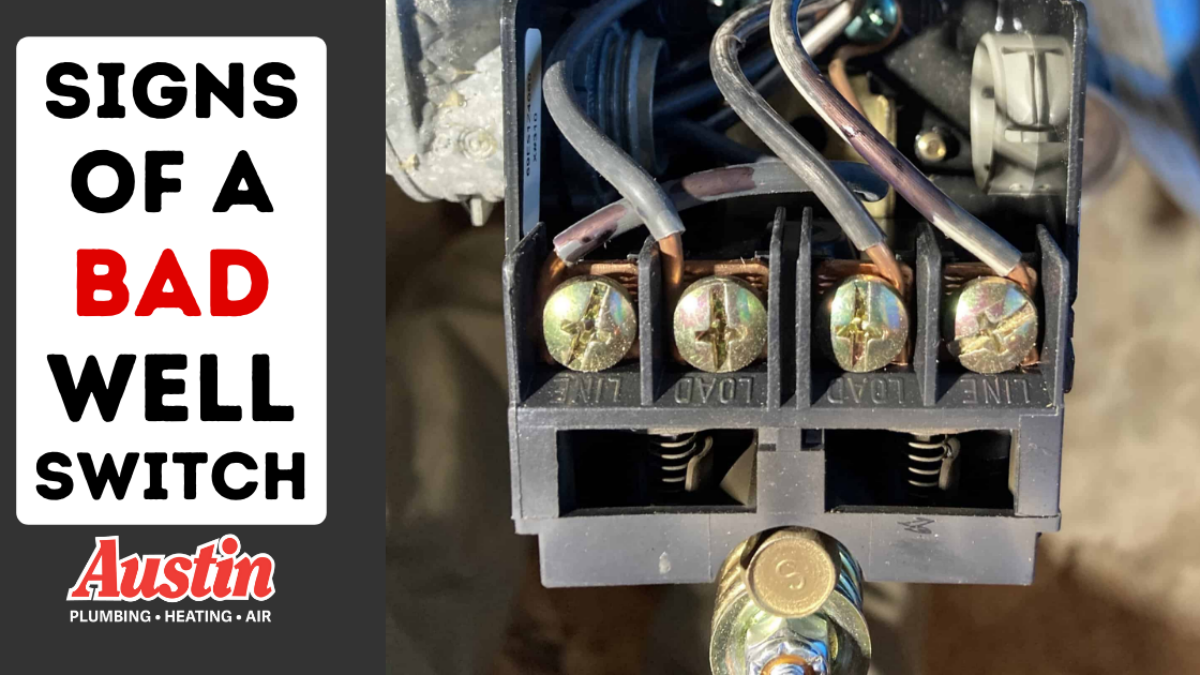
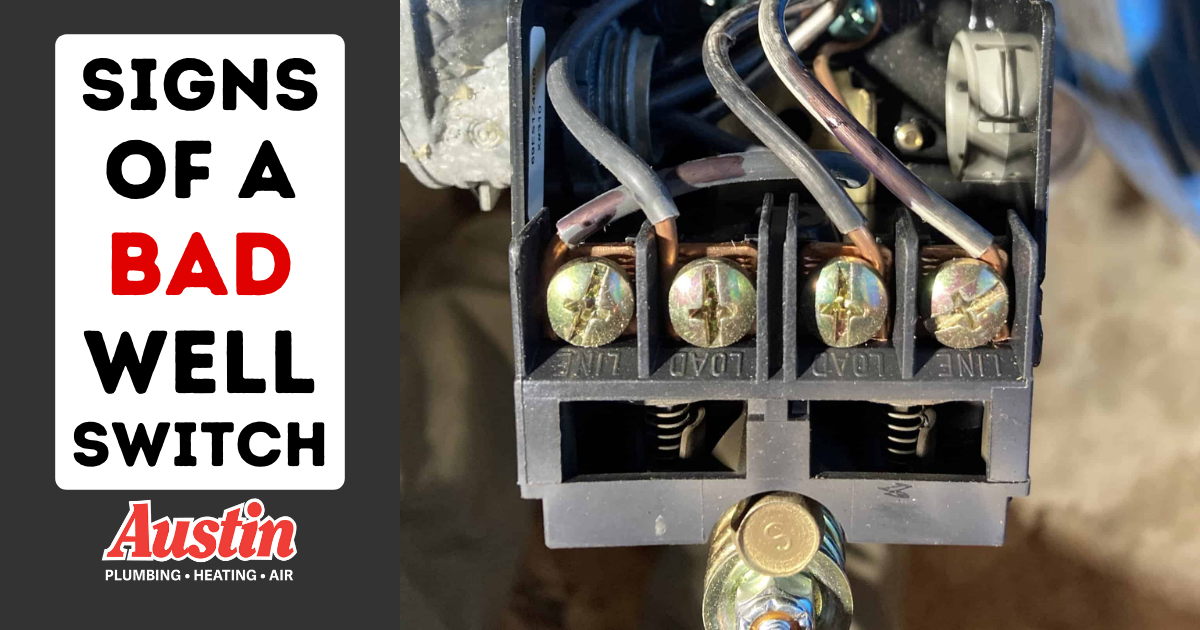
- Bad switch contacts from wear or corrosion.
- Wrong tank precharge or failed bladder.
- Clogged line between tank and switch port.
- Electrical issues such as tripped breakers, bad relays, or low incoming voltage.
- Incorrect switch adjustment or improper installation.

Tools, parts, and safety checklist
Before doing any Water Well Pressure Switch Troubleshooting, gather tools and follow safety rules. A short list makes the job smooth.
- Tools to have
- Multimeter for voltage and continuity.
- Air pressure gauge for tank precharge.
- Screwdrivers, pliers, and small mirror or flashlight.
- Replacement pressure switch and wire connectors.
- Safety steps
- Turn off power at the breaker and lock it out if possible.
- Verify power is off with a meter.
- Relieve system pressure before opening the switch or tank.
- Wear gloves and eye protection.

Step-by-step troubleshooting process
Follow a tested sequence for Water Well Pressure Switch Troubleshooting. Work slowly and verify each finding.
- Visual check
- Look for moisture, corrosion, or loose wires under the switch cover.
- Smell for burnt contacts. Replace switch if contacts are badly pitted.
- Power verification
- With the breaker on, measure voltage to the line side of the switch. Confirm proper voltage.
- Turn power off and test continuity across switch contacts manually.
- Tank pressure check
- Turn pump off and drain pressure below tank port.
- Use an air gauge on the tank valve. Precharge should be 2 psi below cut-in (for a 30/50 system set to 30/50, precharge = 28 psi).
- Check for short cycling
- If cycling, check bladder tank integrity and pressure.
- Inspect plumbing for leaks and the check valve for failure.
- Test switch operation
- With power off, gently lift the manual trip lever (if present) to see if pump starts.
- If lever trips pump but switch won’t close normally, replace switch.
- Check continuity and contacts
- With power off, use the meter to check continuity at cut-in and cut-out pressures by slowly pressurizing or depressurizing system.
- If contacts are inconsistent, replace the switch.
- Wiring and control checks
- Inspect control relays, fuses, and pressure switches in control panels.
- For systems with control boxes, test start capacitors and relays.
A clear, stepwise check cuts down time and prevents misdiagnosis. If a step is unclear, re-check the basics before replacing parts.
Testing techniques and common measurements
Good measurements make Water Well Pressure Switch Troubleshooting reliable. Two tests give the best clues.
- Tank air charge test
- Drain pressure, then check tank air pressure at valve. It should be 2 psi below cut-in. Adjust with a hand pump if needed.
- Electrical tests
- Line voltage should match pump nameplate (often 120V or 240V). Low voltage can make the pump struggle and mimic switch failure.
- Continuity across the switch. No continuity at cut-in means a bad switch.
- Short-cycling diagnosis
- Count cycles per minute. More than one cycle every few minutes means tank or leak issues.
- Pressure gauge vs. switch mismatch
- If gauge reading lags switch action, clean the switch port or install a small filter. Blocked ports cause false trips.

Replacing or adjusting the pressure switch
When repair is not possible, replace the switch. Water Well Pressure Switch Troubleshooting helps you choose and install correctly.
- Choosing a replacement
- Match voltage and amp rating to the pump motor.
- Match or set cut-in/cut-out range (30/50 is most common).
- Consider switches with sealed contacts or built-in surge protection for long life.
- Basic replacement steps
- Cut power at the breaker and verify power off.
- Note wire positions or take a photo of wiring before removing.
- Remove old switch and mount the new one in the same orientation.
- Reconnect wires exactly as before. Tighten connections and use proper wire nuts.
- Restore power and observe one full cycle to confirm settings.
- Adjusting cut-in/cut-out
- Small adjustment screws set cut-in and differential. Make small changes and test.
- Follow manufacturer guidance for how much to move per turn.
If you’re unsure, consult a licensed electrician or well technician. Faulty wiring can damage equipment or cause injury.
Preventive maintenance and schedule
Routine checks cut emergency calls. Water Well Pressure Switch Troubleshooting is easier with simple upkeep.
- Monthly
- Inspect switch cover for moisture and dirt.
- Listen for unusual pump sounds.
- Every 6 months
- Check tank precharge and top up if needed.
- Check pressure gauge accuracy.
- Annually
- Replace the pressure switch if contacts show wear.
- Test pump performance and voltage under load.
Small preventive steps prevent bigger failures later. Keep a simple log of tests and any parts changed.
Common mistakes and troubleshooting pitfalls
Avoid these errors when doing Water Well Pressure Switch Troubleshooting. They save time and money.
- Replacing the switch first without checking tank pressure. Often the tank is the real issue.
- Working with power on. Always verify power is off before touching wires.
- Ignoring voltage drop. Long wire runs or weak service can mimic bad switches.
- Tightening contacts without replacing pitted parts. That is a short-term fix.
- Skipping the check valve and plumbing inspection. Leaks and failed check valves change pressure behavior.
Personal experience and lessons learned
From years on service calls, here are real lessons from Water Well Pressure Switch Troubleshooting.
I once replaced a pressure switch twice in a month. The pump still short-cycled. I checked the bladder tank and found the bladder ruptured. The tank was the real cause. Since then, I test the tank precharge before swapping switches.
Another time, corroded switch contacts gave intermittent failures. Cleaning helped briefly, but a sealed contacts switch lasted much longer. My rule now is to replace badly pitted switches instead of patching them.
These small lessons cut repeat visits and build trust with customers.
Frequently Asked Questions of Water Well Pressure Switch Troubleshooting
Why does my pump short cycle after I replace the pressure switch?
Short cycling after a switch change usually means the tank precharge is wrong or the bladder is damaged. Check the tank pressure and inspect for waterlogged tank symptoms.
How do I know if the pressure switch or the pump is bad?
Use simple tests: verify line voltage and measure current draw at startup. If voltage and current are normal but the switch won’t close, the switch is likely bad. If current is low or the pump hums, the pump may be the issue.
Can I adjust cut-in and cut-out myself?
Yes, small adjustments are possible on most switches. Always turn power off, make small adjustments, and test. If unsure, consult the switch manual or a technician.
What pressure settings should I use for my home well?
Common settings are 30/50 psi or 40/60 psi. Choose based on household water needs and pump capacity. Higher settings can increase wear and require the pump to be rated for that pressure.
Is it safe to clean switch contacts instead of replacing the switch?
Cleaning can temporarily restore function but won’t last if contacts are deeply pitted or oxidized. Replacing a worn switch is usually the safer and longer-lasting solution.
How often should I replace a pressure switch?
Replace the switch when contacts show wear or when operation becomes unreliable. Many switches last 3–10 years depending on cycles and environment.
What causes a pressure switch to get wet inside?
Moisture enters from condensation, steam, or leaks in the plumbing. A wet switch can short or corrode contacts and should be dried and inspected, with replacement if damaged.
Conclusion
Water Well Pressure Switch Troubleshooting is a practical skill. Start with basic checks: power, tank pressure, and visual inspection. Work step-by-step, use simple tests, and replace parts when wear shows. Small preventive steps prevent big failures. Try the steps here, track your findings, and ask a pro if anything feels uncertain. If this guide helped, subscribe for more tips or leave a comment with your well issue.

