
Most Whirlpool freezer issues are fixable with simple checks: temperature, seals, coils, and defrost.
I have spent years fixing home freezers and writing guides that help people save time and money. This Whirlpool Freezer Troubleshooting Guide walks you through clear checks, step-by-step fixes, and real tips I learned on the job. Read on to diagnose problems fast, decide what to try yourself, and know when to call a pro.

How to use this Whirlpool Freezer Troubleshooting Guide
This section explains how the guide works. Read the quick checklist first. Use the step-by-step sections that match your symptom. Keep safety in mind. Turn off power before opening panels.
What you will get from this Whirlpool Freezer Troubleshooting Guide:
- A simple diagnostic path for common faults.
- Tools and parts to check first.
- Clear do-it-yourself fixes and when to call a technician.
Follow the sequence: check power, temperature settings, door seal, and airflow. These simple checks solve many issues fast. If you need deeper repair, the guide shows what parts matter and what costs to expect.

Common Whirlpool freezer problems and quick causes
This Whirlpool Freezer Troubleshooting Guide groups issues by symptom. That makes it easier to find the right fix. Each entry lists likely causes and quick checks.
Common symptoms covered:
- Not cooling or warm interior
- Frost or ice buildup
- Loud or unusual noises
- Water leaks or puddles
- Ice maker not working
- Lights out or control errors
Knowing the symptom helps narrow the cause quickly. Use the checklist below for a fast scan.

Not cooling or running too long
If your freezer is warm or the compressor runs constantly, act fast. Food safety is at stake.
Likely causes
- Incorrect temperature setting
- Dirty condenser coils
- Faulty evaporator fan
- Weak compressor or sealed-system issue
- Faulty thermostat or control board
Step-by-step checks
- Verify settings
- Set freezer to 0°F (-18°C). Wait 24 hours after change.
- Check power
- Confirm the unit is plugged in and the outlet works.
- Inspect condenser coils
- Locate coils at the back or under the unit. Clean dust and lint with a brush or vacuum.
- Listen for fans and compressor
- Compressor should hum. Evaporator fan runs when compressor is on. If fan is silent, thaw ice and test fan motor.
- Airflow and vents
- Do not block vents with food. Allow space for airflow inside.
When simple checks fail
- If coils are clean and fans run but cooling is poor, the sealed system or compressor may be failing. That requires a qualified technician.
From my experience, a clogged coil or blocked vent is the most common fix. I once revived a warm freezer by cleaning a thick dust layer on the coils and replacing a crushed vent shelf.
Frost, ice build-up, or ice blocking airflow
Excess frost wastes energy and reduces cooling. Solve it quickly.
Typical causes
- Faulty or stuck defrost timer or heater
- Damaged door gasket letting moist air in
- Frequent door openings or long open times
- Poor drain or clogged defrost drain
How to troubleshoot
- Inspect the door seal
- Press along gasket. A tight seal feels even. Replace if torn or rigid.
- Test defrost components
* Manually advance a mechanical defrost timer to see if heater turns on. For electronic units, check error codes. - Clear the drain
- Melt ice in the drain channel and flush with warm water to clear clogs.
- Reduce humidity exposure
- Avoid leaving the door open. Keep the room humidity lower if possible.
Quick DIY defrost
- Unplug unit or turn off power.
- Remove food and allow ice to melt.
- Clean interior and check drain path.
- Restart and monitor temperatures.
A sticky gasket can cause steady frost build-up. I once had a freezer fail after a storm; the gasket had warped slightly and let humid air in. Replacing the gasket stopped the problem.
Strange or loud noises
Humans notice new sounds fast. Identify the type of noise to find the cause.
Common noises and causes
- Buzzing or humming
- Normal compressor sound. Loud buzzing may mean compressor strain or relay issues.
- Clicking
- Start relay or overload protector cycling.
- Rattling or vibration
- Loose panels, fan blade hitting ice, or unit not level.
- Squealing or squeaking
- Worn fan motor bearings or blocked fan.
Troubleshooting steps
- Level the freezer
- Use a level and adjust feet to reduce vibration.
- Inspect fans and blades
- Remove the back panel to check the condenser and evaporator fans. Clear ice or debris.
- Check start relay
- A failing start relay causes repeated clicking and failed starts. Replace the relay if needed.
- Listen carefully
- Note if noise starts when compressor runs. This helps isolate compressor vs. fan.
Small rattle fixes are often simple. Once, a shopper rejected a freezer for noise due to a loose bracket. Tightening screws solved it in minutes.
Water leaks and puddles
Leaks can come from inside or below the unit. Find the source to avoid damage.
Likely causes
- Clogged defrost drain
- Cracked drain pan
- Water supply issues for ice maker
- Door left open or gasket leak
How to diagnose and fix
- Inspect the drain pan
- Pull out and check for cracks. Replace if damaged.
- Clear defrost drain
- Flush with warm water and a small brush to remove obstructions.
- Check ice maker line
- Inspect the water connection for tight fitting and leaks. Tighten or replace hoses.
- Monitor during defrost
- Watch for water flow paths to see where it leaks.
Safety tip: unplug the unit before checking internal plumbing.
Ice maker not working
Ice maker problems are very common and often simple to fix.
Common causes
- Water supply is off or kinked
- Faulty fill valve
- Clogged water filter
- Ice jam or frozen fill tube
- Faulty ice maker module or sensor
Troubleshooting steps
- Confirm water supply
- Ensure the water line is open and not blocked.
- Replace filter
- A clogged filter can stop ice production. Replace per model instructions.
- Check fill tube
- If frozen, thaw with a hair dryer on low setting at safe distance.
- Test ice maker module
- Manually cycle the ice maker or listen for the fill valve during a harvest cycle. Replace the module if it fails.
Personal tip: I found that many ice maker failures are due to a cheap filter left unchanged. Regular filter swaps prevent surprises.
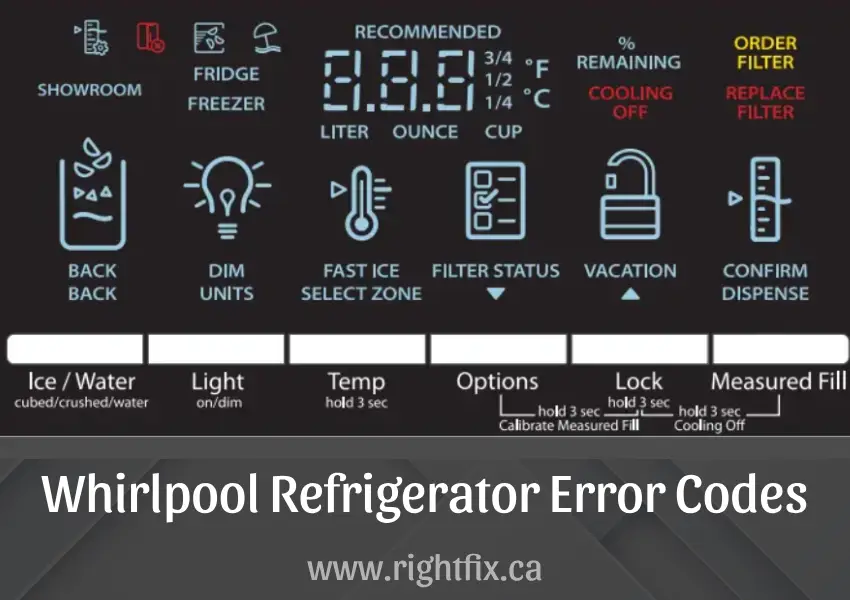
Controls, lights, and display errors
When the panel shows codes or lights fail, use the error info to pinpoint the issue.
Steps to follow
- Reset the unit
- Unplug for five minutes, then plug back in to reset controls.
- Check user manual
- Error codes and blink patterns often map to component faults.
- Inspect interior light
- Replace the bulb. If the light still fails, check the door switch.
- Test the thermostat and sensors
- A faulty thermostat or temperature sensor can cause incorrect readings.
If resets and simple checks do not fix codes, a service tech may need to test the control board or sensors.
Diagnostic checklist and tools
Keep a small kit ready. Use the checklist below to speed troubleshooting.
Essential tools
- Screwdrivers and nut drivers
- Multimeter for voltage and continuity
- Vacuum or brush for coils
- Hair dryer or heat gun on low (for defrost)
- Towels and shallow pans for water
Quick diagnostic checklist
- Is unit powered and plugged in?
- Is temperature set correctly?
- Are coils clean and airflow free?
- Is the door gasket intact?
- Are fans running when compressor runs?
- Any visible frost or ice buildup?
These checks cover most common faults. Use a multimeter only if you know basic electrical safety.
When to call a professional
Some repairs need tools and skills beyond DIY. Know when to stop.
Call a technician for:
- Sealed system repairs or refrigerant leaks
- Compressor replacement or hard-starting compressors
- Complex control board replacements
- Electrical issues beyond simple plugs and fuses
Expect a service call when:
- You smell refrigerant or oil
- The compressor runs but no cooling after coil clean and fan checks
- You lack the tools to test components safely
A trusted technician keeps costs down by diagnosing correctly. In my work, calling a pro promptly avoided a ruined freezer when the compressor failed.
Preventive maintenance and best practices
Routine care keeps your freezer efficient and extends life.
Monthly and quarterly tasks
- Clean condenser coils every 3 to 6 months.
- Check door gasket for cracks or dirt monthly.
- Replace water filter per manual, typically every 6 months.
- Defrost manually if frost exceeds 1/4 inch and if no automatic defrost.
Good habits
- Keep the freezer at 0°F (-18°C).
- Do not overload or block vents.
- Allow hot food to cool before storing.
- Keep the unit level and give clearance around it.
These habits prevent many calls for repairs. I once had a client cut energy use by 25% simply by cleaning the coils and fixing the gasket.
People Also Ask (PAA) — quick short answers
These are common short queries people search when using this Whirlpool Freezer Troubleshooting Guide.
What should I check first if my freezer is warm?
- Check power, temperature setting, door seal, and condenser coils. These solve most warm-freezer cases.
How long after fixing will the temperature drop?
- Allow 24 hours to reach a steady temperature. Avoid frequent door openings during that time.
Can I replace parts myself?
- Simple parts like gaskets, filters, or relays can be DIY if you follow safety steps. Sealed-system repairs need a certified technician.
Is it safe to unplug the freezer to defrost?
- Yes, unplugging and letting ice melt is safe. Remove food or keep it cold with coolers if defrost takes long.
How often should I clean coils?
- Clean coils every 3 to 6 months for best efficiency and to reduce compressor strain.
Frequently Asked Questions of Whirlpool Freezer Troubleshooting Guide
What causes a Whirlpool freezer to stop cooling suddenly?
A sudden loss of cooling is often due to power issues, a tripped breaker, or a failed compressor start relay. Check power and listen for the compressor; if the compressor does not run, call a technician.
How do I fix ice buildup in my Whirlpool freezer?
Check the door seal and defrost system. Manually defrost, clear the drain, and test the defrost heater or timer if the issue repeats.
Why is my Whirlpool freezer making a loud humming noise?
Humming often comes from the compressor or fans. Clean coils and ensure fans are not blocked; if the compressor hums but won’t fully start, a bad start relay may be the cause.
How often should I replace the water filter for the ice maker?
Replace the water filter typically every six months or per the manual. A clogged filter reduces ice production and can cause ice maker errors.
When should I call a pro for my Whirlpool freezer?
Call a pro for sealed-system repairs, compressor failures, persistent electrical faults, or if you cannot safely access parts. These repairs require special tools and expertise.
Conclusion
This Whirlpool Freezer Troubleshooting Guide gives a clear path from quick checks to deeper diagnosis. Start with power, temperature, and seals, then move to fans, coils, and defrost systems. Use simple tools and safety steps, and call a technician for sealed-system and electrical repairs.
Take action today: run the checklist, clean the coils, and inspect the gasket. Share your results or questions below, subscribe for more appliance tips, or leave a comment about your Whirlpool Freezer Troubleshooting Guide experience.

