
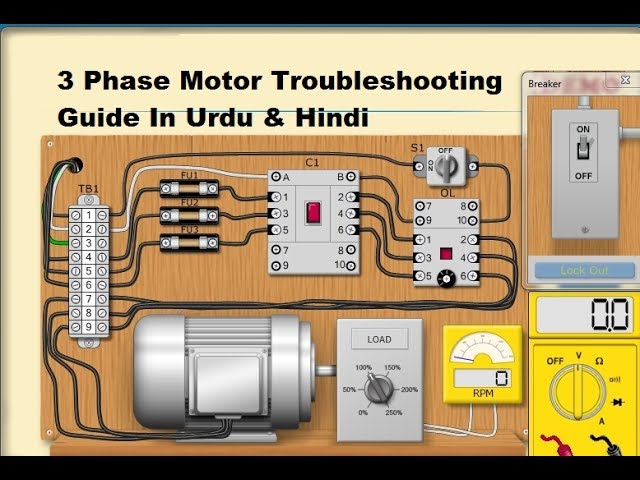
Fast, reliable 3 Phase Motor Troubleshooting finds faults in wiring, bearings, and control systems.
I have spent years diagnosing industrial electric motors and teaching technicians how to read symptoms, perform safe tests, and fix the root cause. This guide on 3 Phase Motor Troubleshooting pulls practical steps, simple checks, and real-world tips into one clear path. Read on to learn how to spot faults fast, use the right tools, and avoid common mistakes when you troubleshoot three-phase motors.
What is 3 Phase Motor Troubleshooting?
3 Phase Motor Troubleshooting is the process of finding and fixing faults in three-phase electric motors. It covers electrical, mechanical, and control issues that stop a motor from running properly. The goal is to restore safe, efficient operation with clear tests and steps. Good troubleshooting saves time and reduces repeat failures.

Common symptoms and root causes for 3 Phase Motor Troubleshooting
Motors show clear signs when something is wrong. Below are common symptoms and likely causes to help you narrow the issue quickly.
- Motor does not start. Could be blown fuse, open phase, failed contactor, or thermal overload.
- Motor hums but won’t turn. Could be locked rotor, single-phasing, or mechanical jam.
- Motor runs hot or draws high current. Likely overload, low voltage, wrong pulley, or bearing drag.
- Unusual noise or vibration. Check misalignment, worn bearings, or bent shaft.
- Intermittent stops or trips. Often wiring, loose connections, or faulty starter parts.
These symptom-to-cause links guide your first checks in 3 Phase Motor Troubleshooting. Start with safety and basic tests to avoid wasted effort.
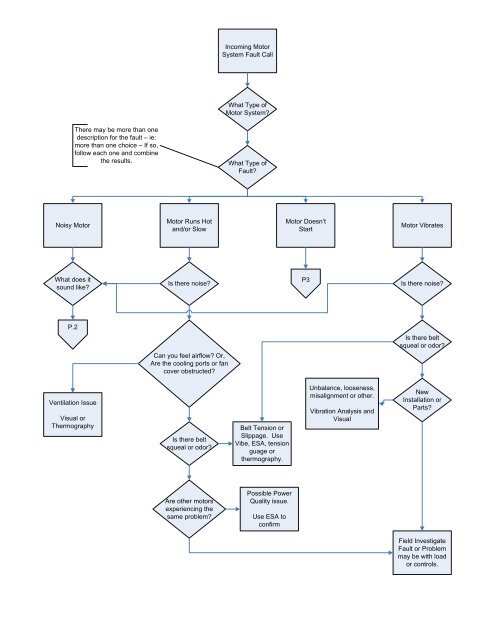
Step-by-step troubleshooting workflow for 3 Phase Motor Troubleshooting
A clear workflow keeps you safe and efficient. Use this ordered plan when diagnosing any three-phase motor.
-
Safety and isolation
- Lock out and tag out the motor. Verify power is off with a tester.
- Wear PPE and follow site policies.
-
Visual and basic checks
- Inspect wiring, connections, and terminal box for burns or corrosion.
- Look for oil, dirt, or signs of overheating.
-
Power and control checks
- Measure supply voltage phase-to-phase and phase-to-neutral.
- Check contactor coil, overload relay, and start circuit.
-
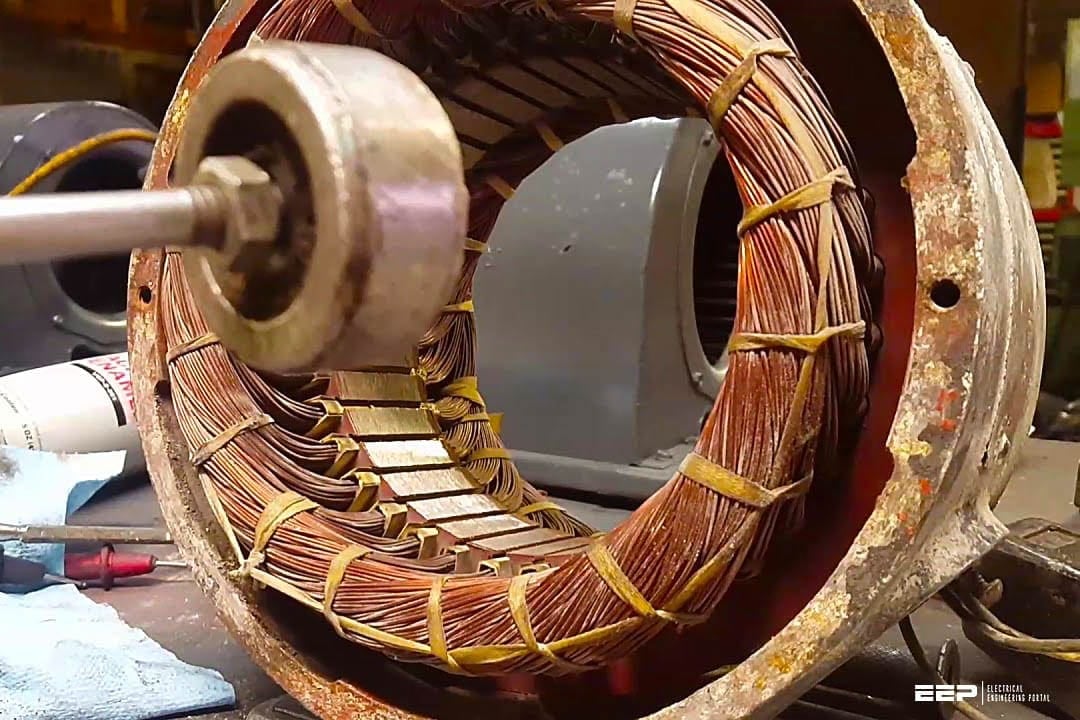
Insulation and winding tests
- Use a megohmmeter to test insulation resistance.
- Perform a winding resistance test to find open or shorted turns.
-
Mechanical checks
- Rotate the shaft by hand if safe. Feel for roughness or binding.
- Inspect bearings, couplings, and alignment.
-
Run tests and record data
- Run the motor under controlled load. Monitor current, vibration, and temperature.
- Compare values to nameplate and past records.
This workflow makes 3 Phase Motor Troubleshooting predictable and repeatable. Log results for future maintenance.

Electrical tests and tools for accurate 3 Phase Motor Troubleshooting
The right tools speed diagnosis and reduce guesswork. Here are essential tools and what they reveal.
-
Multimeter
- Checks continuity and basic AC voltages. Good for quick phase voltage checks.
-
Clamp meter (AC)
- Measures running current without disconnecting wires. Useful for load checks.
-
Megohmmeter (insulation tester)
- Tests insulation resistance of windings. Low values show degraded insulation.
-
Phase rotation indicator
- Confirms correct phase rotation. Important for motor rotation direction.
-
Contact cleaner and thermal camera
- Thermal camera finds hot connections. Contact cleaner helps reconnect dirty parts.
-
Motor test bench tools (if available)
- Allow controlled tests off the line for detailed diagnosis.
When you use these tools properly, 3 Phase Motor Troubleshooting becomes scientific instead of guesswork. Always follow meter safety ratings and test limits.

Mechanical checks, bearings, and alignment in 3 Phase Motor Troubleshooting
Mechanical faults often look like electrical issues. Don’t skip these checks.
-
Bearings
- Listen for grinding or growling. Low lubrication, contamination, or wear cause heat and noise.
-
Shaft and coupling
- Check for wobble, loose keys, or damaged coupling elements. Replace worn parts.
-
Alignment
- Misalignment increases vibration and bearing life loss. Use a straightedge or laser for tight machines.
-
Load issues
- Inspect driven equipment for jams, belt slip, or wrong pulley ratios. A blocked fan load can overheat the motor.
Simple mechanical fixes can resolve many motor failures. In my experience, a quick shaft spin and bearing check solved 40 percent of calls.

Control and drive issues to include in 3 Phase Motor Troubleshooting
The starter and drive system often hide the fault. Test these elements early.
-
Starters and contactors
- Check coil voltage, contacts, and wear. Burned contacts increase resistance and heat.
-
Overload relays
- Confirm settings match motor full-load current. Wrong settings cause nuisance trips.
-
Variable Frequency Drives (VFDs)
- Check drive faults and parameter locks. Inspect input fuses, DC bus, and cooling fans.
-
Control wiring and sensors
- Verify interlocks, emergency stops, and safeties. Loose control wires cause intermittent faults.
Control faults can mimic motor faults. Test control circuits step-by-step to isolate the issue in 3 Phase Motor Troubleshooting.

Preventive maintenance and best practices for long-term 3 Phase Motor Troubleshooting
Good maintenance prevents many troubleshooting calls. Use these practices to reduce downtime.
-
Scheduled inspections
- Check terminals, belts, and couplings every month or as the site requires.
-
Lubrication plan
- Grease bearings per manufacturer intervals. Avoid over-greasing.
-
Thermal and vibration monitoring
- Capture trends to act before failure. Small changes predict large failures.
-
Keep records
- Log readings, repairs, and replacements. Records speed future 3 Phase Motor Troubleshooting.
-
Training and checklists
- Train staff on safe tests and checks. Use simple checklists for routine tasks.
Investing time in maintenance cuts reactive troubleshooting significantly.
Real-world case studies and personal experience with 3 Phase Motor Troubleshooting
Here are short real examples from my field work. They show how simple tests solve tough problems.
-
Case 1: Single-phasing on a pump motor
- Symptom: Motor hummed and tripped on overload. Test: Measured phase voltages and found a blown fuse in one leg. Fix: Replaced fuse and tightened a loose lug. Lesson: Visual checks and voltage readings are fast winners.
-
Case 2: Overheating conveyor motor
- Symptom: Motor ran hot and tripped daily. Test: Insulation test passed but current was high. Found pulley worn and belt slipping, causing extra load. Fix: Replaced pulley and belt, motor cooled immediately. Lesson: Always inspect driven equipment.
-
Case 3: Intermittent VFD fault
- Symptom: Motor tripped with no clear pattern. Test: Logged VFD alarms and found DC bus voltage dips during plant start. Fix: Staggered startup and added soft-start to main feeder. Lesson: System context matters in 3 Phase Motor Troubleshooting.
These stories show that tools, clear steps, and thinking systemically solve most problems.
Quick PAA-style questions about 3 Phase Motor Troubleshooting
What is the first test you should run in 3 Phase Motor Troubleshooting?
Start with a visual inspection and verify power isolation. Then measure supply voltage and phase balance.
How do you check for single-phasing quickly?
Measure phase-to-phase voltage with a multimeter while the motor is off and during start if possible. Look for a missing or low phase reading.
When should you use a megohmmeter in 3 Phase Motor Troubleshooting?
Use a megger when you suspect insulation breakdown or moisture ingress. Test before reconnecting a motor that sat unused or was exposed to water.
Frequently Asked Questions of 3 Phase Motor Troubleshooting
What causes a three-phase motor not to start?
A motor may not start due to blown fuses, open phase, faulty contactor, or thermal overload. Mechanical jams or locked rotors can also prevent start.
How can I test if a motor winding is open?
Use a multimeter to measure winding resistance across phases. A reading of infinite or very high resistance suggests an open winding.
Can a bad bearing cause electrical signs?
Yes, bearing failure can raise current draw and temperature, which mimic electrical faults. Always check bearings when electrical tests are inconclusive.
Is it safe to run a motor for testing with one phase missing?
No. Running with a missing phase can overheat and damage the motor quickly. Use cautious short tests only for diagnosis if absolutely required and safe.
How often should I perform preventive checks for motors?
Monthly visual checks and quarterly or semiannual detailed checks are common. Adjust frequency based on duty, environment, and criticality.
Conclusion
3 Phase Motor Troubleshooting becomes simple when you follow a clear plan. Start with safety, use basic tests, and inspect mechanical parts before assuming complex failures. Track data and do regular maintenance to reduce surprises. Try the workflow here on your next motor issue, log your results, and share what you find to help others learn. If this guide helped, subscribe for more practical tips or leave a comment with your toughest motor problem.

