
Genie Garage Door Opener Troubleshooting Red Light Blinking means the opener detected a fault with sensors, power, or the logic board.
I have worked on many garage openers and seen that a blinking red light on a Genie means the system is telling you something important. This article explains Genie Garage Door Opener Troubleshooting Red Light Blinking from simple fixes to advanced checks, with clear steps, real tips from hands-on experience, and safety-first advice so you can diagnose and fix the problem with confidence. Read on to learn why the red light blinks, what to test first, and when to call a pro.

How the Genie opener red light works
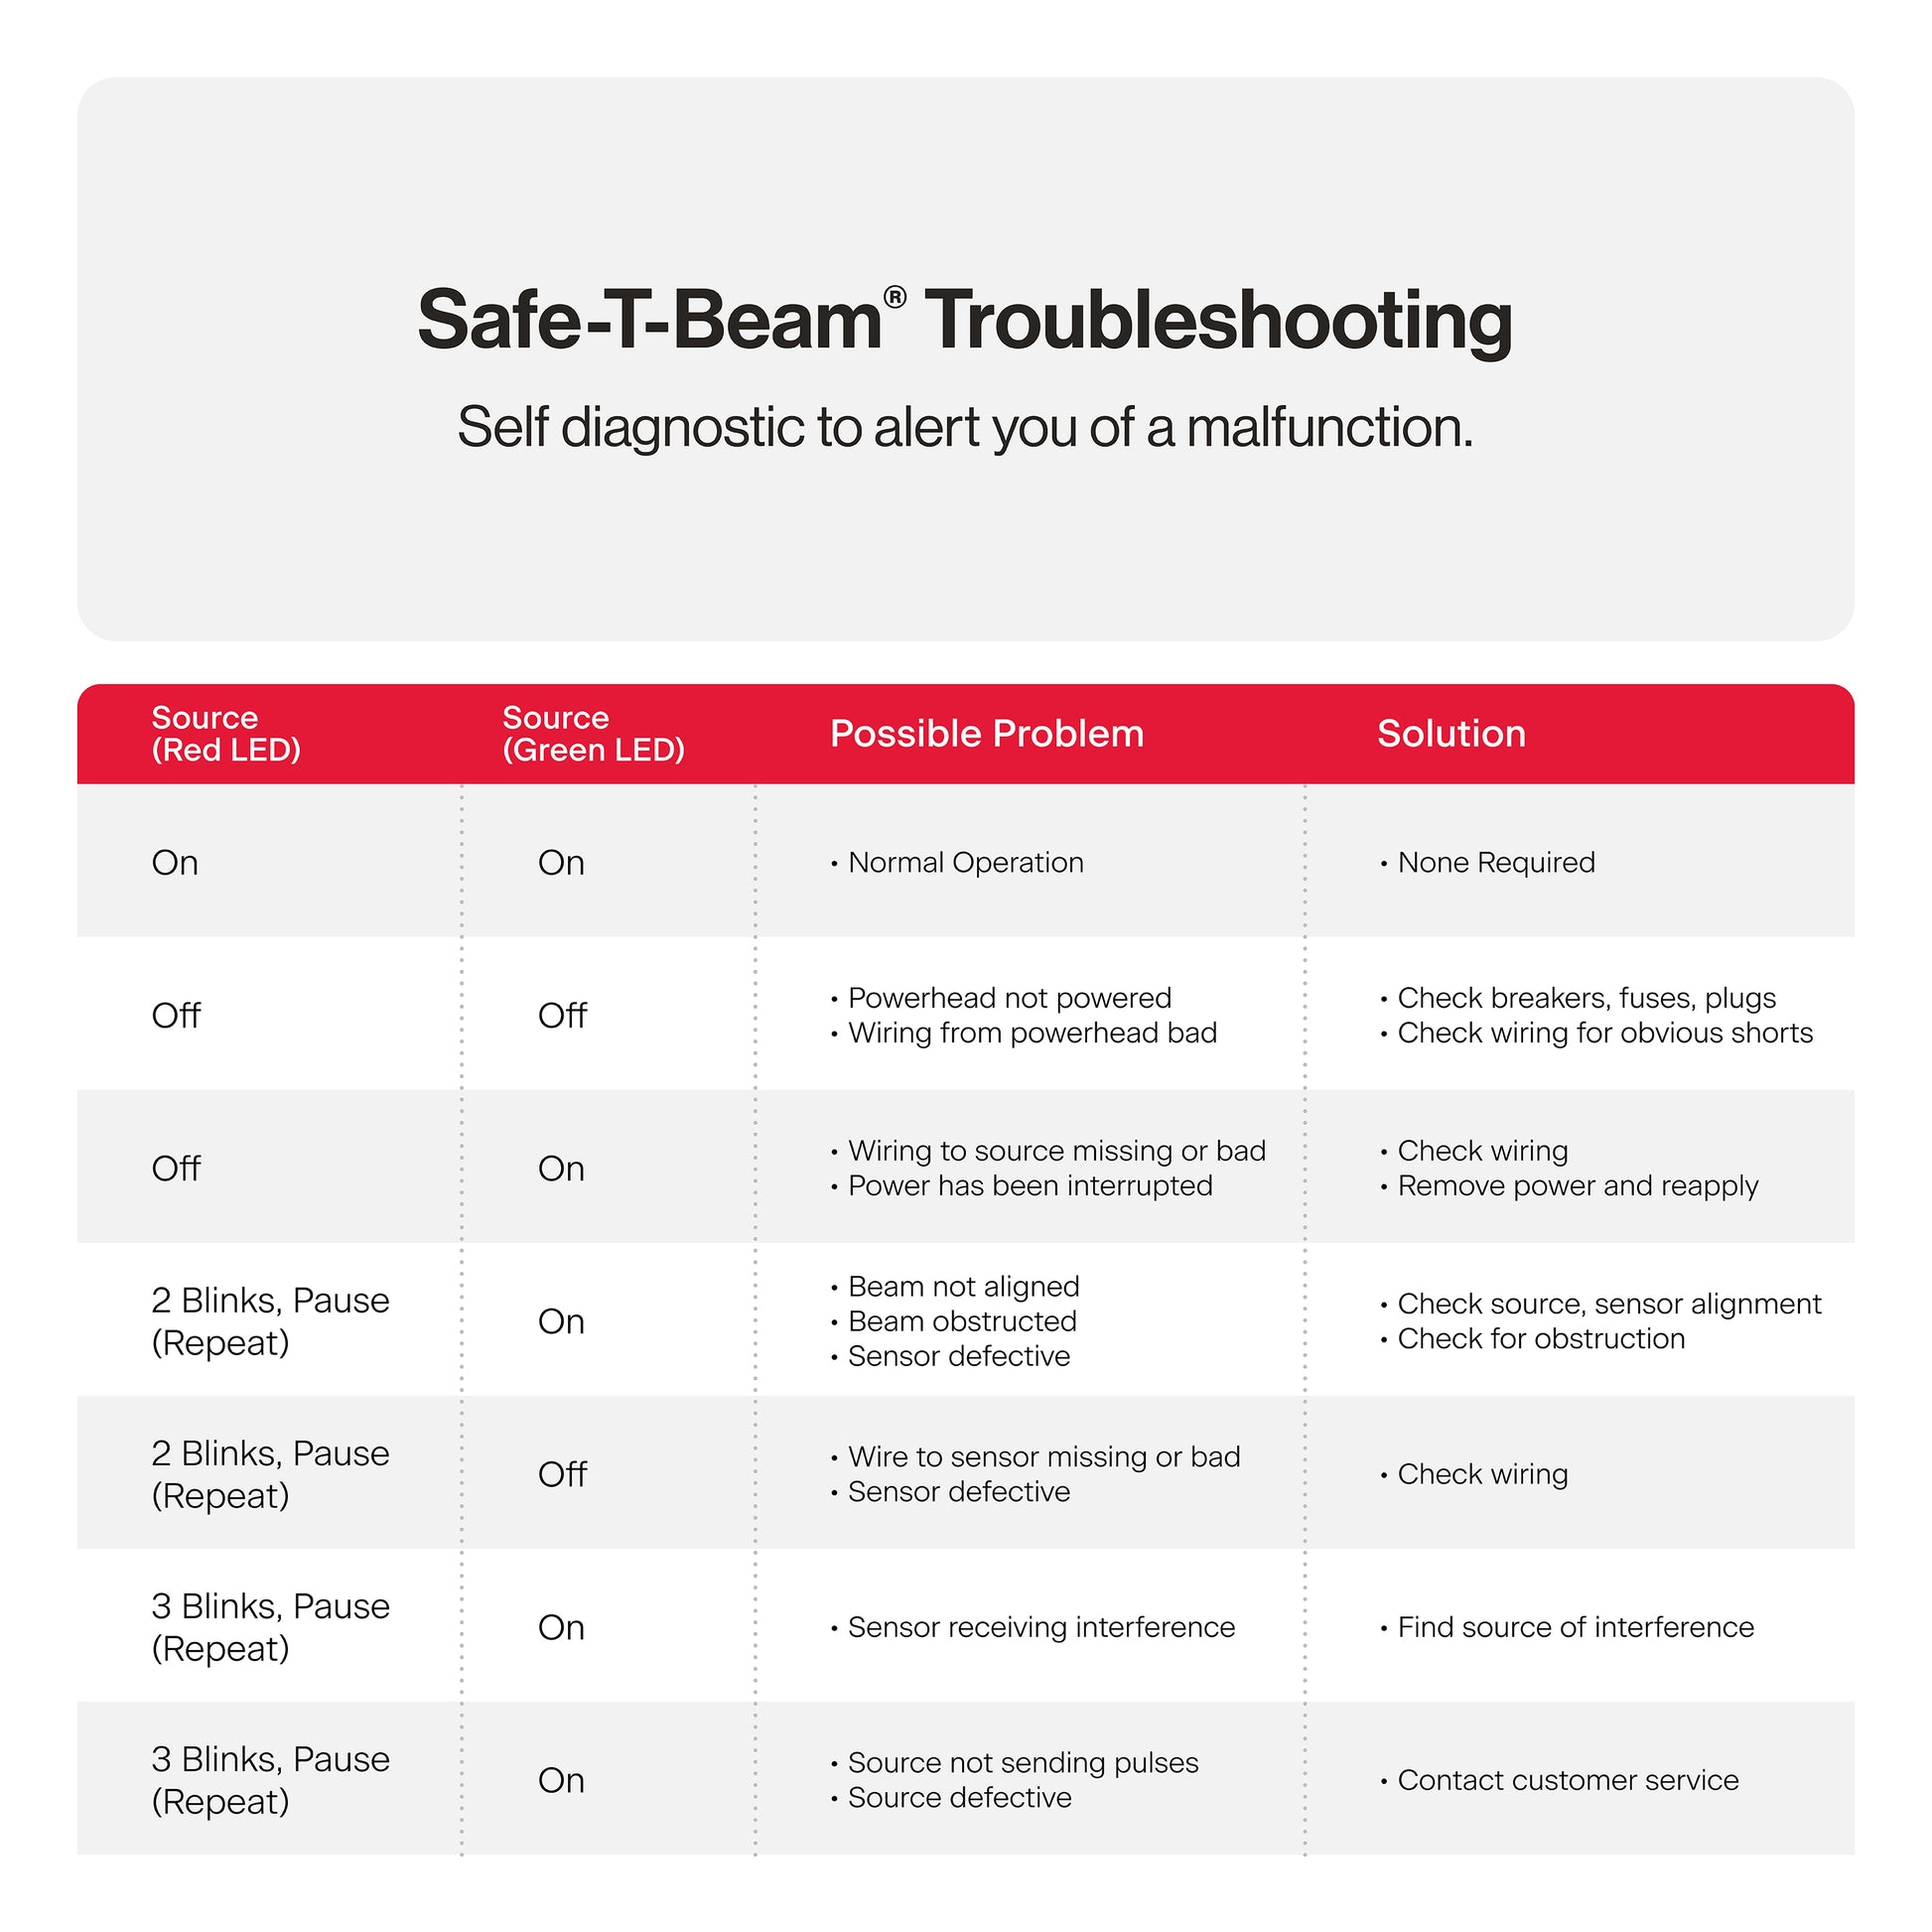
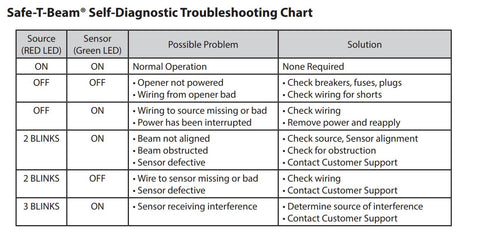
The red LED on Genie models is a diagnostic signal. It flashes to show issues like misaligned sensors, low power, motor faults, or circuit errors.
Manufacturers use blink patterns to point to specific problems. A steady blink might mean one thing, while a fast or slow pattern can mean another.
Knowing the basic meaning helps you narrow down the cause fast. Genie Garage Door Opener Troubleshooting Red Light Blinking is mainly about reading those signs and testing sensors and power first.

Common causes of Genie Garage Door Opener Troubleshooting Red Light Blinking
Most red light blinks fall into a few repeatable categories. I list the common causes below so you can check them in order.
- Safety sensor misalignment or blockage. Sensors must face each other and be clear of dust or cobwebs.
- Power or wiring issues. Loose wires, tripped breakers, or poor outlet voltage can trigger the blink.
- Remote or wall control faults. Shorted buttons or defective transmitters sometimes cause error signals.
- Logic board or motor control faults. Circuit board failures or burned components produce persistent blinking.
- Limit or force setting errors. Incorrect limits can confuse the opener and show a fault light.
- Interference or programming errors. New devices or strong RF can disrupt communication.
These cover most cases when doing Genie Garage Door Opener Troubleshooting Red Light Blinking. Start with the easiest checks first.

Step-by-step troubleshooting guide
Follow this clear sequence to diagnose the issue safely. I recommend reading each step fully before acting.
- Check power and outlet
- Confirm the opener has power. Test the wall outlet and check the circuit breaker.
- If power is intermittent, reset the breaker and try another outlet with a lamp.
- Inspect safety sensors
- Make sure both photo-eye sensors are aligned and at the same height.
- Clean lenses with a soft cloth and remove obstructions like plants or debris.
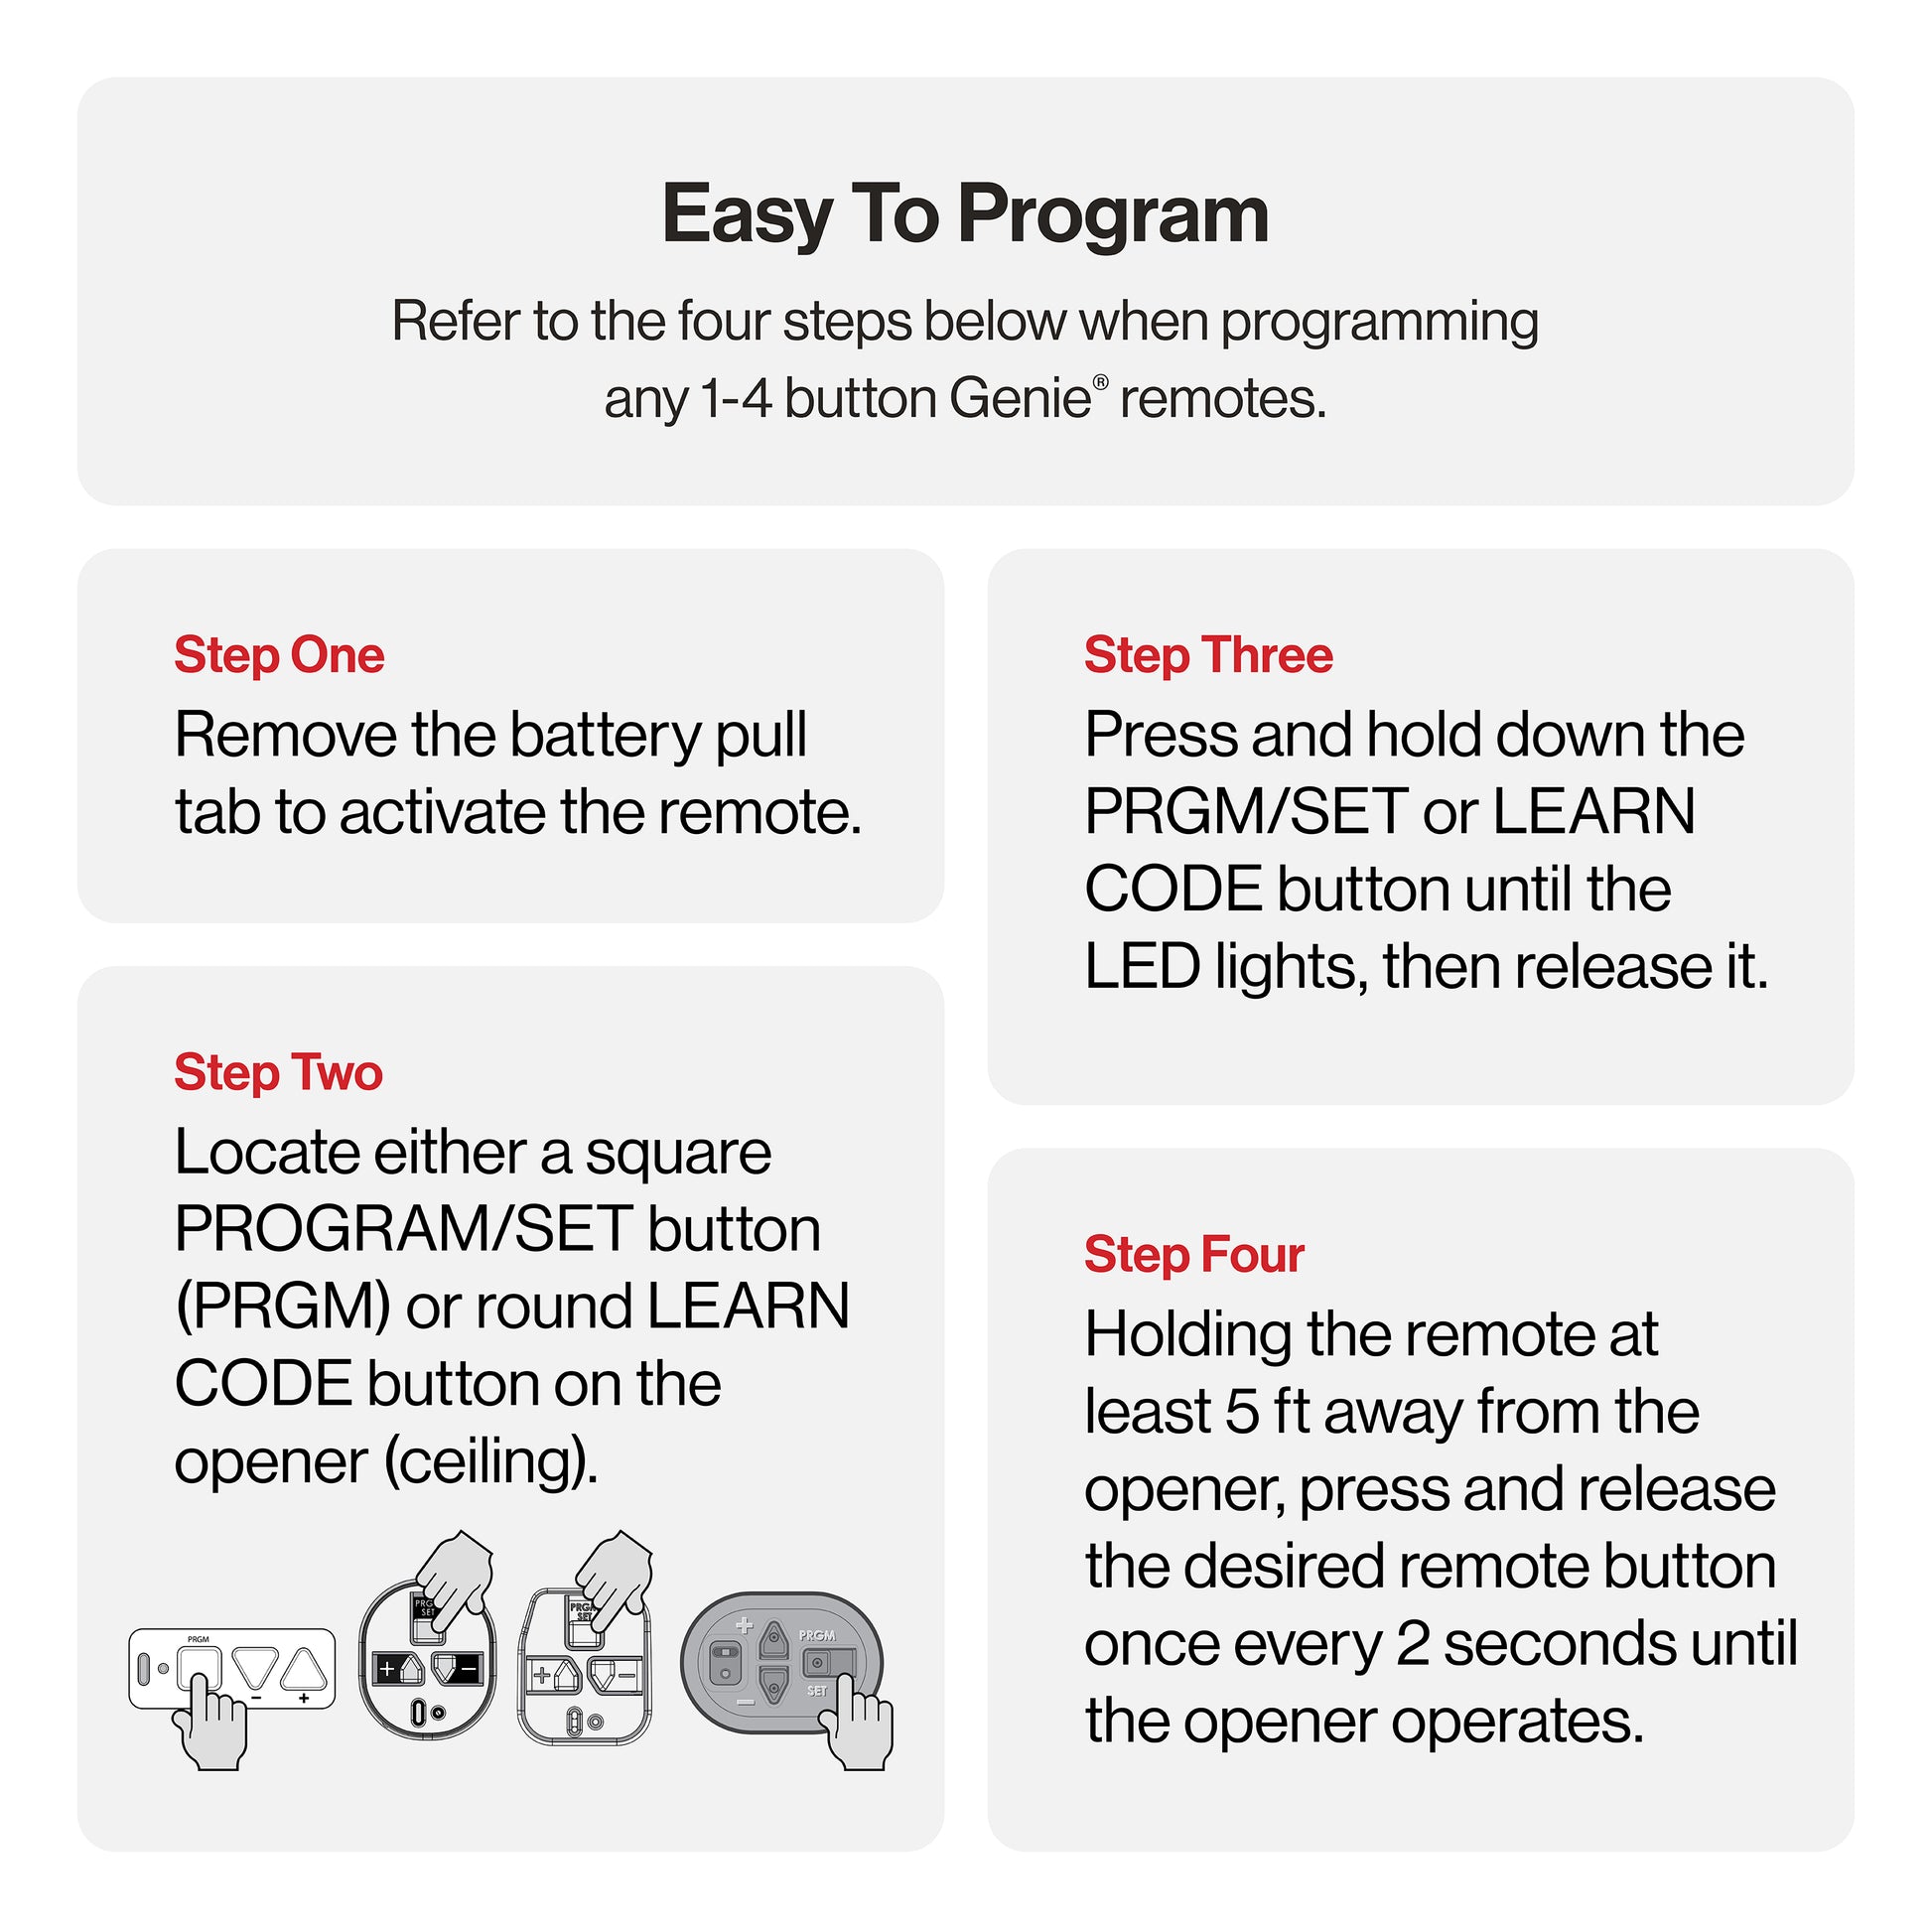
- Test the reset or learn button
- Locate the opener’s learn/reset button. Press per manual to reset settings.
- Observe the red light after reset; note changes in blink rate.
- Check wiring and connections
- Inspect low-voltage wires between sensors and the opener for breaks or corrosion.
- Secure loose connectors and replace frayed wire sections.
- Cycle the door manually
- Disconnect the trolley and move the door by hand to check for binding.
- Tight spots or worn rollers can cause motor strain and trigger fault lights.
- Test remotes and wall control
- Remove batteries from remotes and test wall control only.
- Reprogram one remote at a time to isolate a bad transmitter.
- Note blink patterns
- Count blinks or watch fast vs slow patterns and compare to Genie diagnostics.
- Use the pattern to decide if the circuit board or sensors are likely at fault.
If these steps do not stop the red light, move to advanced checks. Keep safety first: unplug power before touching internal parts.

Advanced diagnostics and repairs
When basic checks fail, deeper work may be needed. I’ve repaired openers where the board or motor needed replacement.
- Circuit board testing
- Visual check for burned components or bulging capacitors.
- Use a multimeter on low-voltage outputs if you know safe test points.
- Replace the board if multiple outputs fail or if visible damage exists.
- Sensor wiring and continuity
- Test sensor wires for continuity and shorts.
- Replace entire sensor pair if one sensor fails internal tests.
- Motor or gear issues
- Listen for grinding or hums when running the opener.
- A seized gear pack or failing motor can create fault codes and blinking.
- Firmware and programming resets
- Some Genie units accept firmware resets or recalibration.
- Follow the model-specific manual steps for firmware recovery.
- Safety interlocks and limit switches
- Inspect limit switches and cams for correct settings.
- Adjust limits carefully; small changes can stop unwanted reversals.
If you are not comfortable with electrical tests, call a certified garage door technician. Working on mains power and internal boards carries risk.
Maintenance tips to prevent red light faults
Regular care reduces surprises and keeps the LED quiet. I follow a seasonal checklist that has helped me avoid many repair calls.
- Clean sensor lenses monthly to keep the beam clear.
- Lubricate rollers, hinges, and the opener rail per manufacturer suggestions.
- Inspect wiring annually for rodent damage or wear.
- Test reversing sensors every month using a soft object under the door.
- Tighten hardware and check springs for balance each season.
- Keep the opener area free of dust, cobwebs, and moisture.
A small routine prevents many causes of Genie Garage Door Opener Troubleshooting Red Light Blinking.
When to call a professional
Some faults need trained hands and tools. Call a pro if you see any of these signs.
- Persistent blinking after all sensor and power checks.
- Burning smells, smoke, or visible board damage.
- Springs, cables, or heavy-duty parts need replacement.
- You are uncomfortable testing live circuits or replacing control boards.
A certified technician has the right parts and knows local safety rules. This helps avoid injury or costly mistakes.
Frequently Asked Questions of Genie Garage Door Opener Troubleshooting Red Light Blinking
What does a blinking red light on my Genie opener mean?
A blinking red light signals a detected fault. It usually points to sensors, wiring, power, or the control board.
How do I reset the red light on a Genie opener?
Unplug the opener, wait 60 seconds, then plug it back in and press the learn/reset button as the manual directs. If the cause is not fixed, the light will return.
Can dirty sensors cause the red light to blink?
Yes. Dirty or blocked photo-eyes often cause the opener to show a blinking red light. Clean the lenses and realign the sensors to fix this.
Is it safe to open the Genie control box myself?
Only if you know basic electrical safety and unplug the unit first. If you lack experience, hire a technician to avoid shock or damage.
Will replacing the control board stop the blinking light?
If the board is the root cause, replacing it will usually stop the blinking. Confirm the board is faulty before spending on parts.
How can I tell if the problem is the remote or the opener?
Remove remote batteries and test the wall switch. If the wall switch works and the red light persists, the opener or sensors are likely the issue.
Conclusion
You can resolve most Genie Garage Door Opener Troubleshooting Red Light Blinking issues with a clear, safe checklist: check power, inspect and clean sensors, test wiring, and reset controls. If the blinking persists after these steps, rely on a trained technician for advanced diagnostics and parts replacement. Take action: start with the simple checks today, note the blink pattern, and schedule professional help if needed. Leave a comment with your model and blink pattern to get tailored advice, or subscribe for more hands-on garage door tips.

