
Payne Ac Unit Troubleshooting: Find and fix common Payne AC faults fast and safely.

Today's Exclusive Deals
Limited-time Exclusive Deals. Check current discount on Amazon.
Check Price on Amazon As an Amazon Associate I earn from qualifying purchases.I’ve worked on dozens of systems and tested many Payne Ac Unit Troubleshooting steps. This article walks you through clear checks, real-world tips, and safe fixes. You’ll learn how Payne Ac Unit Troubleshooting works, how to spot causes, and when to call a pro—all in plain language and short steps.
How Payne AC Units Work — Quick Overview
Payne Ac Unit Troubleshooting starts best with a simple view of how the system runs. A Payne central air system has three main parts: the thermostat, the indoor air handler, and the outdoor condensing unit. Power, airflow, and refrigerant must all be right for cool air to reach your rooms.
Today's Exclusive Deals
Limited-time Exclusive Deals. Check current discount on Amazon.
Check Price on Amazon As an Amazon Associate I earn from qualifying purchases.Understanding the flow helps you spot where issues begin. Most faults show clear signs, like no cooling, odd noises, or short cycling. With a basic plan, you can find many problems at home and fix small ones yourself.

Common Problems and Causes
Payne Ac Unit Troubleshooting focuses on the problems you will see most often. Here are common faults, their signs, and likely causes.
Today's Exclusive Deals
Limited-time Exclusive Deals. Check current discount on Amazon.
Check Price on Amazon As an Amazon Associate I earn from qualifying purchases.- No cooling: Unit runs but air is warm. Causes include low refrigerant, clogged coils, or compressor issues.
- Short cycling: Unit turns on and off often. Causes include thermostat errors, improper refrigerant charge, or safety switches tripping.
- Weak airflow: Blower runs but output is low. Causes include dirty air filters, blocked ducts, or failing blower motor.
- Unit won’t start: No power or no response. Causes include tripped breakers, blown fuses, or faulty contactors.
- Loud noises: Rattles, hums, or screeches. Causes include loose parts, failing fan motor, or compressor problems.
- Water leaks: Indoor drain pans overflow. Causes include clogged condensate drains or frozen coils.
Payne Ac Unit Troubleshooting often narrows to routines you can perform safely. Start with power, filters, and visible blockages. Many fixes are low-cost and quick.
Step-by-Step Troubleshooting Checklist
Follow this checklist for methodical Payne Ac Unit Troubleshooting. Do each step, then test the unit.
- Check thermostat
- Ensure it’s set to cool and below room temp.
- Replace batteries if present.
- Verify power
- Check circuit breaker and disconnect switch at the unit.
- Look for tripped GFCI or blown fuses.
- Inspect filter
- Replace or clean the air filter if dirty.
- A clogged filter cuts airflow and strains the system.
- Examine outdoor unit
- Clear debris, leaves, and tall grass from around the condenser.
- Make sure fan spins freely.
- Listen and look
- Note any odd sounds or visible oil or frost on lines.
- Check drain
- Clear condensate drain and P-trap.
- Flush with a small amount of vinegar if slow.
- Test safety switches
- Float switch or pressure switches can shut the unit down.
- Reset only after addressing the root cause.
- Call for refrigeration work
- If you suspect low refrigerant, call a licensed HVAC tech.
Do not touch electrical parts or refrigerant lines unless you are trained. Safety first. This checklist solves many typical Payne Ac Unit Troubleshooting cases.

Diagnostic Tips by Component
Breakdown checks by each part make Payne Ac Unit Troubleshooting faster. Use these quick tests.
Thermostat
- Confirm proper mode and temperature setting.
- Swap to a known-good thermostat or use a simple plug-in thermometer to compare.
Air Filter and Airflow
- Hold filter up to light. Replace if blocked.
- Check vents for closed dampers or furniture blocking them.
Outdoor Condenser
- Turn off power at the disconnect. Clean fins gently with a soft brush.
- Straighten bent fins with a fin comb.
Blower and Indoor Unit
- Inspect belt-driven blowers for wear.
- Check the blower wheel for dirt build-up and clean if needed.
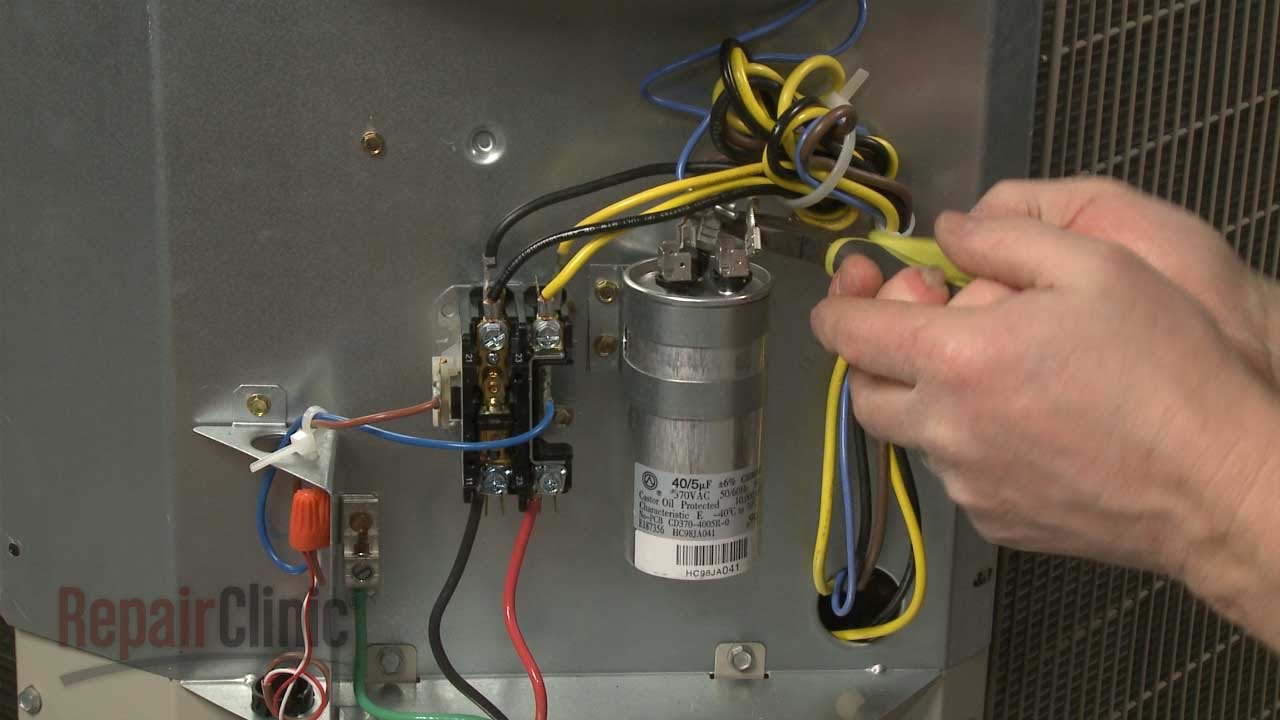
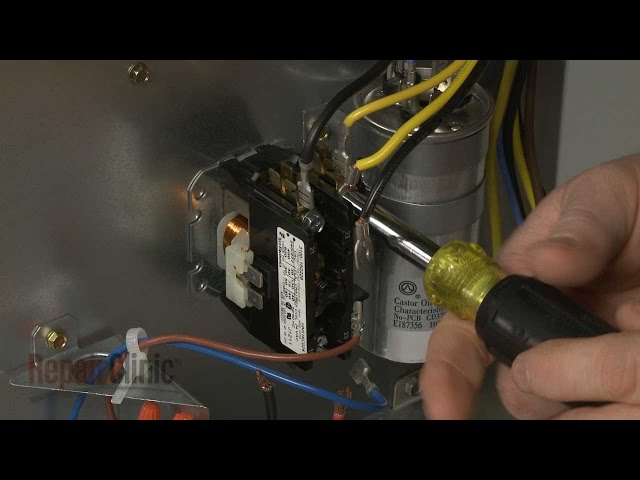
Capacitor and Contactor
- Bulging capacitors often fail; replace if swollen.
- Contactor pitting means replace; sparking indicates replacement is due.
Compressor and Refrigerant
- Signs of low refrigerant: frosting on evaporator coil or warm discharge line.
- Compressor that hums but won’t start may have electrical faults or bad start components.
Safety Switches and Drainage
- Test float switch by lifting it; unit should shut off or reset accordingly.
- Clean the drain with a long brush or wet/dry vacuum if blocked.
These targeted tests speed up Payne Ac Unit Troubleshooting and reduce guesswork. Keep a notepad and record what you observe.

Safety and When to Call a Pro
Payne Ac Unit Troubleshooting can be safe when you stick to low-voltage and visual tasks. Stop and call a pro if:
- You smell gas or burning.
- Refrigerant handling is required.
- Electrical parts need testing or replacement.
- The compressor is hot, humming, or tripping breakers.
Licensed techs handle refrigeration, sealed system repairs, and high-voltage work. I’ve seen DIY attempts make a small issue worse. Call a trusted HVAC contractor when in doubt. When you call, provide your model number and details from your checklist to speed repairs.
Maintenance Tips to Prevent Problems
Simple upkeep reduces Payne Ac Unit Troubleshooting needs. Do these regularly.
- Change filters every 1–3 months depending on use.
- Keep 2 feet of clearance around the outdoor unit.
- Schedule spring and fall tune-ups with a pro.
- Clean coils once a year or more if dirty.
- Flush condensate drain every few months.
I recommend setting calendar reminders for filter changes and annual service. Preventive care saves money and avoids emergency calls.

Parts, Costs, and Replacement Advice
When parts fail, know the likely costs and options. Prices vary by region and model.
- Replacement capacitor or contactor: usually low cost and quick swap.
- Blower motor: moderate cost, labor varies by access.
- Compressor or refrigerant repair: high cost and may prompt unit replacement.
- Control board replacement: moderate to high cost depending on complexity.
If repair cost exceeds half the value of an older unit, consider replacement. Newer units are more efficient and often save money over time. Keep receipts and service records to get accurate estimates from technicians.
People Also Ask — Quick Answers
How long can a Payne AC unit last?
A well-maintained Payne AC unit can last 12 to 18 years. Regular maintenance and timely repairs extend life.
What causes an AC to freeze up?
Restricted airflow or low refrigerant usually causes coil freeze. Clean filters and check refrigerant levels to troubleshoot.
Can I reset my Payne AC unit myself?
You can reset the breaker and the outdoor disconnect. For resets involving control boards or refrigerant, call a pro.

Frequently Asked Questions of Payne Ac Unit Troubleshooting
What is the first thing to check when a Payne AC stops cooling?
Start with the thermostat setting, the circuit breaker, and the air filter. These simple checks resolve many issues quickly.
Why is my Payne AC short cycling?
Short cycling often stems from thermostat problems, low refrigerant, or an overheated compressor. Check thermostat placement and call a tech for refrigerant or compressor issues.
How often should I replace the air filter?
Replace filters every 1–3 months depending on dust and pets. A clean filter improves airflow and efficiency.
Is a frozen evaporator coil dangerous?
A frozen coil can damage the compressor if left running. Turn off cooling, switch to fan, and thaw before restarting.
Why does my Payne outdoor unit make loud noises?
Loud noise can mean loose panels, failing fan motor, or compressor issues. Tighten panels and inspect fan; call a technician for compressor noise.
Can I recharge refrigerant myself?
No. Recharging refrigerant requires certification and special tools. Improper handling harms the system and the environment.
How do I know when to replace the whole unit?
Consider replacement when repairs are frequent, efficiency is low, or repair costs exceed half the unit value. Newer models offer better efficiency and reliability.
Conclusion
Payne Ac Unit Troubleshooting becomes straightforward with a clear plan. Check power, filters, airflow, and obvious signs first, then move to component tests. Regular maintenance prevents most failures and keeps costs down.
Take action today: run the checklist, change your filter, and schedule a tune-up if needed. Share your experience or questions below, or subscribe for more hands-on HVAC tips and troubleshooting guides.


