
Reversing Valve Troubleshooting fixes directional flow issues in HVAC systems quickly and safely.

Today's Exclusive Deals
Limited-time Exclusive Deals. Check current discount on Amazon.
Check Price on Amazon As an Amazon Associate I earn from qualifying purchases.I’ve worked on heat pumps and refrigeration systems for over a decade, and I write from hands-on experience and industry knowledge. This article walks you through Reversing Valve Troubleshooting step by step. You will learn how reversing valves work, common failure modes, clear diagnostic tests, repair and maintenance tips, and real-world lessons I learned on the job. Read on and get confident diagnosing and fixing reversing valve problems safely and efficiently.
How Reversing Valves Work
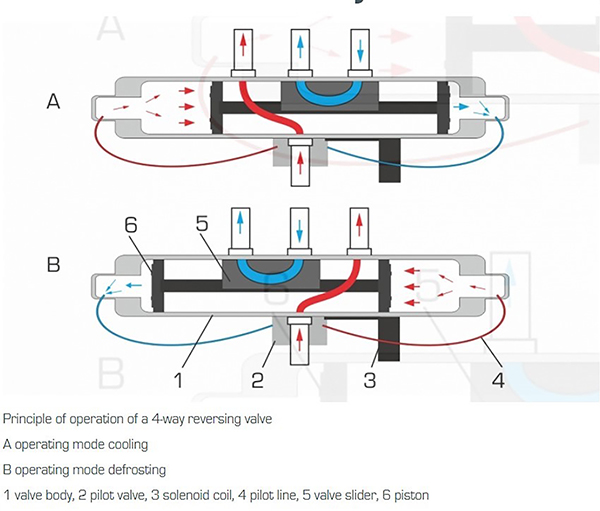
A reversing valve changes refrigerant flow to switch between heating and cooling modes in heat pumps. It uses a solenoid or actuator to move an internal spool. When energized, the valve redirects high-pressure and low-pressure lines so the system reverses function.
Today's Exclusive Deals
Limited-time Exclusive Deals. Check current discount on Amazon.
Check Price on Amazon As an Amazon Associate I earn from qualifying purchases.Key parts to know:
- Valve body. The metal housing where ports connect.
- Spool or slide. The moving internal part that routes refrigerant.
- Solenoid or actuator. The device that shifts the spool electrically.
- Pilot lines and ports. Small passages that help balance pressure.
Understanding these parts makes Reversing Valve Troubleshooting easier. Knowing how the valve shifts tells you what test to run next.

Today's Exclusive Deals
Limited-time Exclusive Deals. Check current discount on Amazon.
Check Price on Amazon As an Amazon Associate I earn from qualifying purchases.Common Problems and Root Causes
Reversing valve issues show up in a few predictable ways. Recognize symptoms early for a quick fix.
Common symptoms:
- System won’t change modes. It stays in heating or cooling only.
- Noisy operation. Clicking, knocking, or hissing when the valve switches.
- Slow or partial switching. Mode change is sluggish or incomplete.
- Refrigerant balance problems. Odd high/low pressures after switching.
Frequent causes:
- Electrical faults. Blown fuses, bad coils, or broken wiring prevent actuation.
- Sticking spool. Debris, varnish, or corrosion immobilize the spool.
- Valve wear. Seals and sleeves wear out over years of cycling.
- Incorrect refrigerant charge. Low or overcharge affects pilot balance.
- Control logic or thermostat issues. The valve may not receive the right signal.
Spotting the cause narrows your Reversing Valve Troubleshooting path quickly.

Step-by-Step Reversing Valve Troubleshooting Guide
Follow a safe, ordered process. Wear proper PPE and isolate power before working.
Step 1: Verify control signals
- Check thermostat or controller settings. Confirm mode change is commanded.
- Measure voltage at the solenoid. Typical values are 24 VAC for HVAC systems.
- Replace blown fuses or fix wiring faults.
Step 2: Listen and observe during a mode change
- Put the system into the other mode and watch. Note clicks and delays.
- If you hear a soft click but no change, the coil may be weak.
Step 3: Test coil resistance
- With power off, measure coil ohms. Compare to manufacturer spec.
- Very high or infinite ohms means an open coil. Very low ohms may mean short.
Step 4: Apply controlled power for bench test
- Energize the solenoid briefly with the correct voltage while watching pressures.
- If the valve doesn’t shift under proper power, spool may be stuck.
Step 5: Check refrigerant pressures
- Use gauges to compare high and low side pressures before and after switching.
- Abnormal or unchanged pressures indicate internal blockage or stuck spool.
Step 6: Inspect for contamination
- If you open the system, check for metal shavings, sludge, or oil breakdown.
- Contaminants can lock the spool or wear surfaces.
Step 7: Follow manufacturer service limits
- If the valve is serviceable, follow torque and cleaning instructions.
- If a replacement is required, ensure new valve matches capacity and ports.
From years of troubleshooting, I learned to always verify control signals first. It saves time. I once replaced a valve only to find a loose wire was the real culprit. Learn from that: test the simple things before opening the system.

Testing and Diagnostic Methods
Use these diagnostic methods to validate your findings. They are safe and effective when done properly.
Static tests:
- Visual inspection. Look for oil leaks, burned insulation, or signs of corrosion.
- Coil continuity. A quick multimeter test helps rule out electrical faults.
Dynamic tests:
- Live switching test. Observe pressure and temperature response while switching modes.
- Pressure step test. Slightly vary charge or load to see if valve responds.
Advanced diagnostics:
- Use a borescope to inspect internal spool condition without full disassembly.
- Leak detection and oil analysis can reveal contamination or breakdown.
- Compare system performance data to baseline or manufacturer charts.
Document each test result. This builds trust and helps find intermittent problems during Reversing Valve Troubleshooting.
Repair, Replacement, and Preventive Maintenance
Decide early whether to repair or replace. Consider cost, downtime, and long-term reliability.
Repair tips:
- Clean spool and bores carefully with approved solvents.
- Replace worn seals and springs if available as a kit.
- Rebuild only if you can confirm internal parts are within tolerances.
Replacement considerations:
- Match the valve model for capacity and port layout.
- Use OEM or equivalent valves rated for your refrigerant type.
- Replace sight glass or filter driers during major repairs to prevent recontamination.
Preventive maintenance:
- Regularly check electrical connections and coil resistance.
- Run the system through both modes periodically to keep the spool free.
- Keep filters, driers, and oil in good condition to reduce wear.
Maintenance cuts down the need for Reversing Valve Troubleshooting. In my shop, a quarterly check saved multiple valves from failure.

People Also Ask
How do I test a reversing valve quickly?
Measure the coil voltage during a mode change and watch pressure shifts. If the coil gets correct voltage but no pressure change occurs, the spool is likely stuck.
Can a reversing valve be repaired in the field?
Some valves allow field servicing of seals and spools, but many are replaced for reliability. Consider system age, contamination, and cost before deciding.
What symptoms show a bad reversing valve?
Common signs are failure to switch modes, odd noises during switching, and little or no change in system pressures after command. These point to mechanical or electrical faults.
Frequently Asked Questions of Reversing Valve Troubleshooting
What is the most common cause of reversing valve failure?
The most common cause is a stuck spool from debris, oil varnish, or corrosion. Electrical faults are also frequent causes and should be checked first.
How long does a reversing valve typically last?
A well-maintained reversing valve can last many years, often 10 to 15 years, depending on cycles and system conditions. Harsh environments or poor maintenance shorten that life.
Is it safe to apply power directly to a reversing valve coil?
You can bench-test a coil with the correct voltage but only with proper safety and isolation. Never bypass safety controls or apply wrong voltage, as this can damage the system.
Will a low refrigerant charge affect reversing valve operation?
Yes. Low charge can change pilot balances and reduce the pressure needed to shift the spool, causing slow or failed switching. Confirm charge before condemning the valve.
Can a reversing valve be the cause of noisy operation?
Yes. A worn spool or improper seating can cause knocking, clicking, or hissing noises during switching. Noise may also come from loose mounts or line vibration.
Should I change the filter drier when replacing a reversing valve?
It’s best practice to replace the filter drier when you open the system for valve replacement, especially if contamination is present. This prevents new valve fouling.
How do I prevent reversing valve problems?
Run the system through both modes regularly, maintain proper refrigerant and oil condition, and keep electrical connections tight. Scheduled maintenance reduces failures.
Conclusion
Reversing Valve Troubleshooting is a mix of clear tests, careful observation, and sound judgment. Start with control signals, then move to electrical checks, pressure tests, and inspection. Use preventive maintenance to avoid many issues. My best advice: test simple things first, document results, and follow manufacturer limits. Try these steps on your next system check, share what you find, and subscribe or comment if you want more hands-on tips and checklists.


