
A Vehicle Ac Troubleshooting Chart is a quick guide to diagnose AC faults fast and accurately.

Today's Exclusive Deals
Limited-time Exclusive Deals. Check current discount on Amazon.
Check Price on Amazon As an Amazon Associate I earn from qualifying purchases.As an automotive technician with over a decade working on car heating and cooling systems, I designed and used vehicle AC troubleshooting charts daily. This guide explains what a Vehicle Ac Troubleshooting Chart is, how to read one, and how to apply it to find and fix the most common AC problems. Read on to learn clear steps, useful checks, and real-life tips that save time and money when your car’s AC struggles.

Understanding the Vehicle Ac Troubleshooting Chart
A Vehicle Ac Troubleshooting Chart is a visual table or flowchart. It links symptoms to likely causes and suggested actions. Charts vary by vehicle make and model, but all aim to reduce guesswork. A well-made chart covers electrical issues, refrigerant levels, compressor faults, airflow problems, and control module errors. I rely on charts to speed up diagnosis and avoid unnecessary parts replacement.
Today's Exclusive Deals
Limited-time Exclusive Deals. Check current discount on Amazon.
Check Price on Amazon As an Amazon Associate I earn from qualifying purchases.Common chart elements:
- Symptom column with clear descriptions.
- Likely cause column listing ranked problems.
- Diagnostic checks with tools and expected readings.
- Recommended fixes and safety notes.
Why charts work:
- They reduce diagnostic time.
- They keep steps consistent across techs.
- They help prioritize tests and parts.

Today's Exclusive Deals
Limited-time Exclusive Deals. Check current discount on Amazon.
Check Price on Amazon As an Amazon Associate I earn from qualifying purchases.Key Components of a Vehicle Ac Troubleshooting Chart
A complete chart has sections for symptom, cause, check, and action. Each part guides you from what you notice to what to test. The check column shows the measurement or visual inspection needed. The action column suggests repair, replace, or further testing.
Essential components:
- Symptom: warm air, weak airflow, odd noises, odors, or leaks.
- Cause: low refrigerant, failed compressor clutch, clogged cabin filter, or blown fuse.
- Checks: static pressure, compressor engagement, continuity tests, or visual inspection.
- Actions: recharge refrigerant, replace filter, fix wiring, or replace compressor.
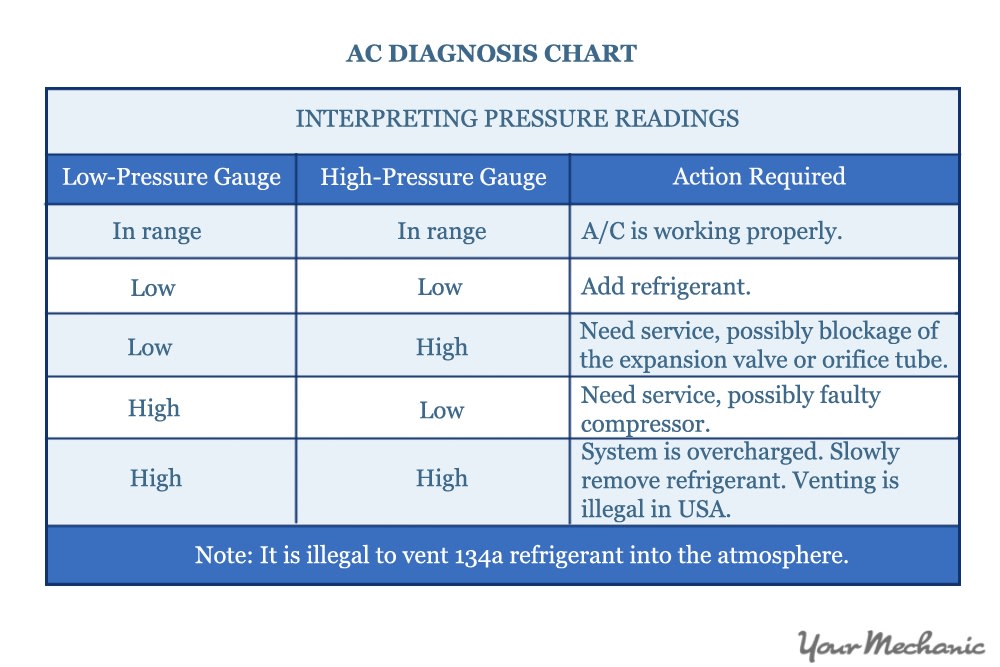
From my shop work, charts that include expected pressure ranges and electrical values are the most useful. They cut down back-and-forth and improve accuracy.
How to Use a Vehicle Ac Troubleshooting Chart Step by Step
Using the chart is simple if you follow a clear order. Start with easy visual checks. Move to basic electrical tests. Finish with refrigerant and component tests.
Step-by-step process:
- Observe the symptom and match it on the chart.
- Do visual checks: leaks, belt condition, filters, and vents.
- Check fuses and relays for the AC system.
- Measure compressor clutch engagement and current draw.
- Check refrigerant pressures with gauges at both ports.
- Follow the chart’s action column for repair or further diagnostics.
Practical tip from experience:
- Always perform a cabin airflow check first. Many “AC failures” are simply clogged filters or closed blend doors.

Common AC Problems Mapped on the Chart
Charts usually map these common issues. Below are typical symptoms with likely causes and quick fixes you’ll see on a Vehicle Ac Troubleshooting Chart.
Warm air from vents:
- Likely cause: low refrigerant, failed compressor, or climate control fault.
- Quick fix: check pressures, test compressor clutch, inspect control module.
Weak airflow:
- Likely cause: blocked cabin filter, bad blower motor, or obstructed ducts.
- Quick fix: inspect and replace filter, test blower motor voltage.
AC cycles on and off:
- Likely cause: thermal expansion valve issue, or pressure switch problem.
- Quick fix: monitor high/low side pressures, test pressure switches.
Strange noises:
- Likely cause: failing compressor bearings or debris in system.
- Quick fix: listen with a mechanic’s stethoscope, test compressor lock-up.
Leaks or oil stains:
- Likely cause: hose or seal failure.
- Quick fix: dye test or UV inspection, replace faulty lines or seals.
Tools and Tests Referenced in the Chart
A chart lists basic tools and tests. You don’t need expensive gear to follow the chart, but proper tools speed safe and accurate work.
Common tools:
- Manifold gauge set for refrigerant pressures.
- Digital multimeter for voltages and continuity.
- UV dye kit to locate leaks.
- Infrared thermometer for vent temperatures.
- Vacuum pump for evacuation and leak testing.
How to interpret readings:
- Low side pressure too low with compressor off can mean undercharge.
- Equalized pressure near ambient after long run suggests leak or undercharge.
- No compressor engagement with correct voltage suggests clutch or control issue.

Using the Chart for Electrical vs Refrigerant Issues
Charts separate electrical problems from refrigerant faults. This saves time by eliminating unnecessary refrigerant handling when the issue is electrical.
Electrical-first checks:
- Verify fuses and relays.
- Test AC switch and climate control module.
- Check compressor clutch voltage and ground.
Refrigerant checks:
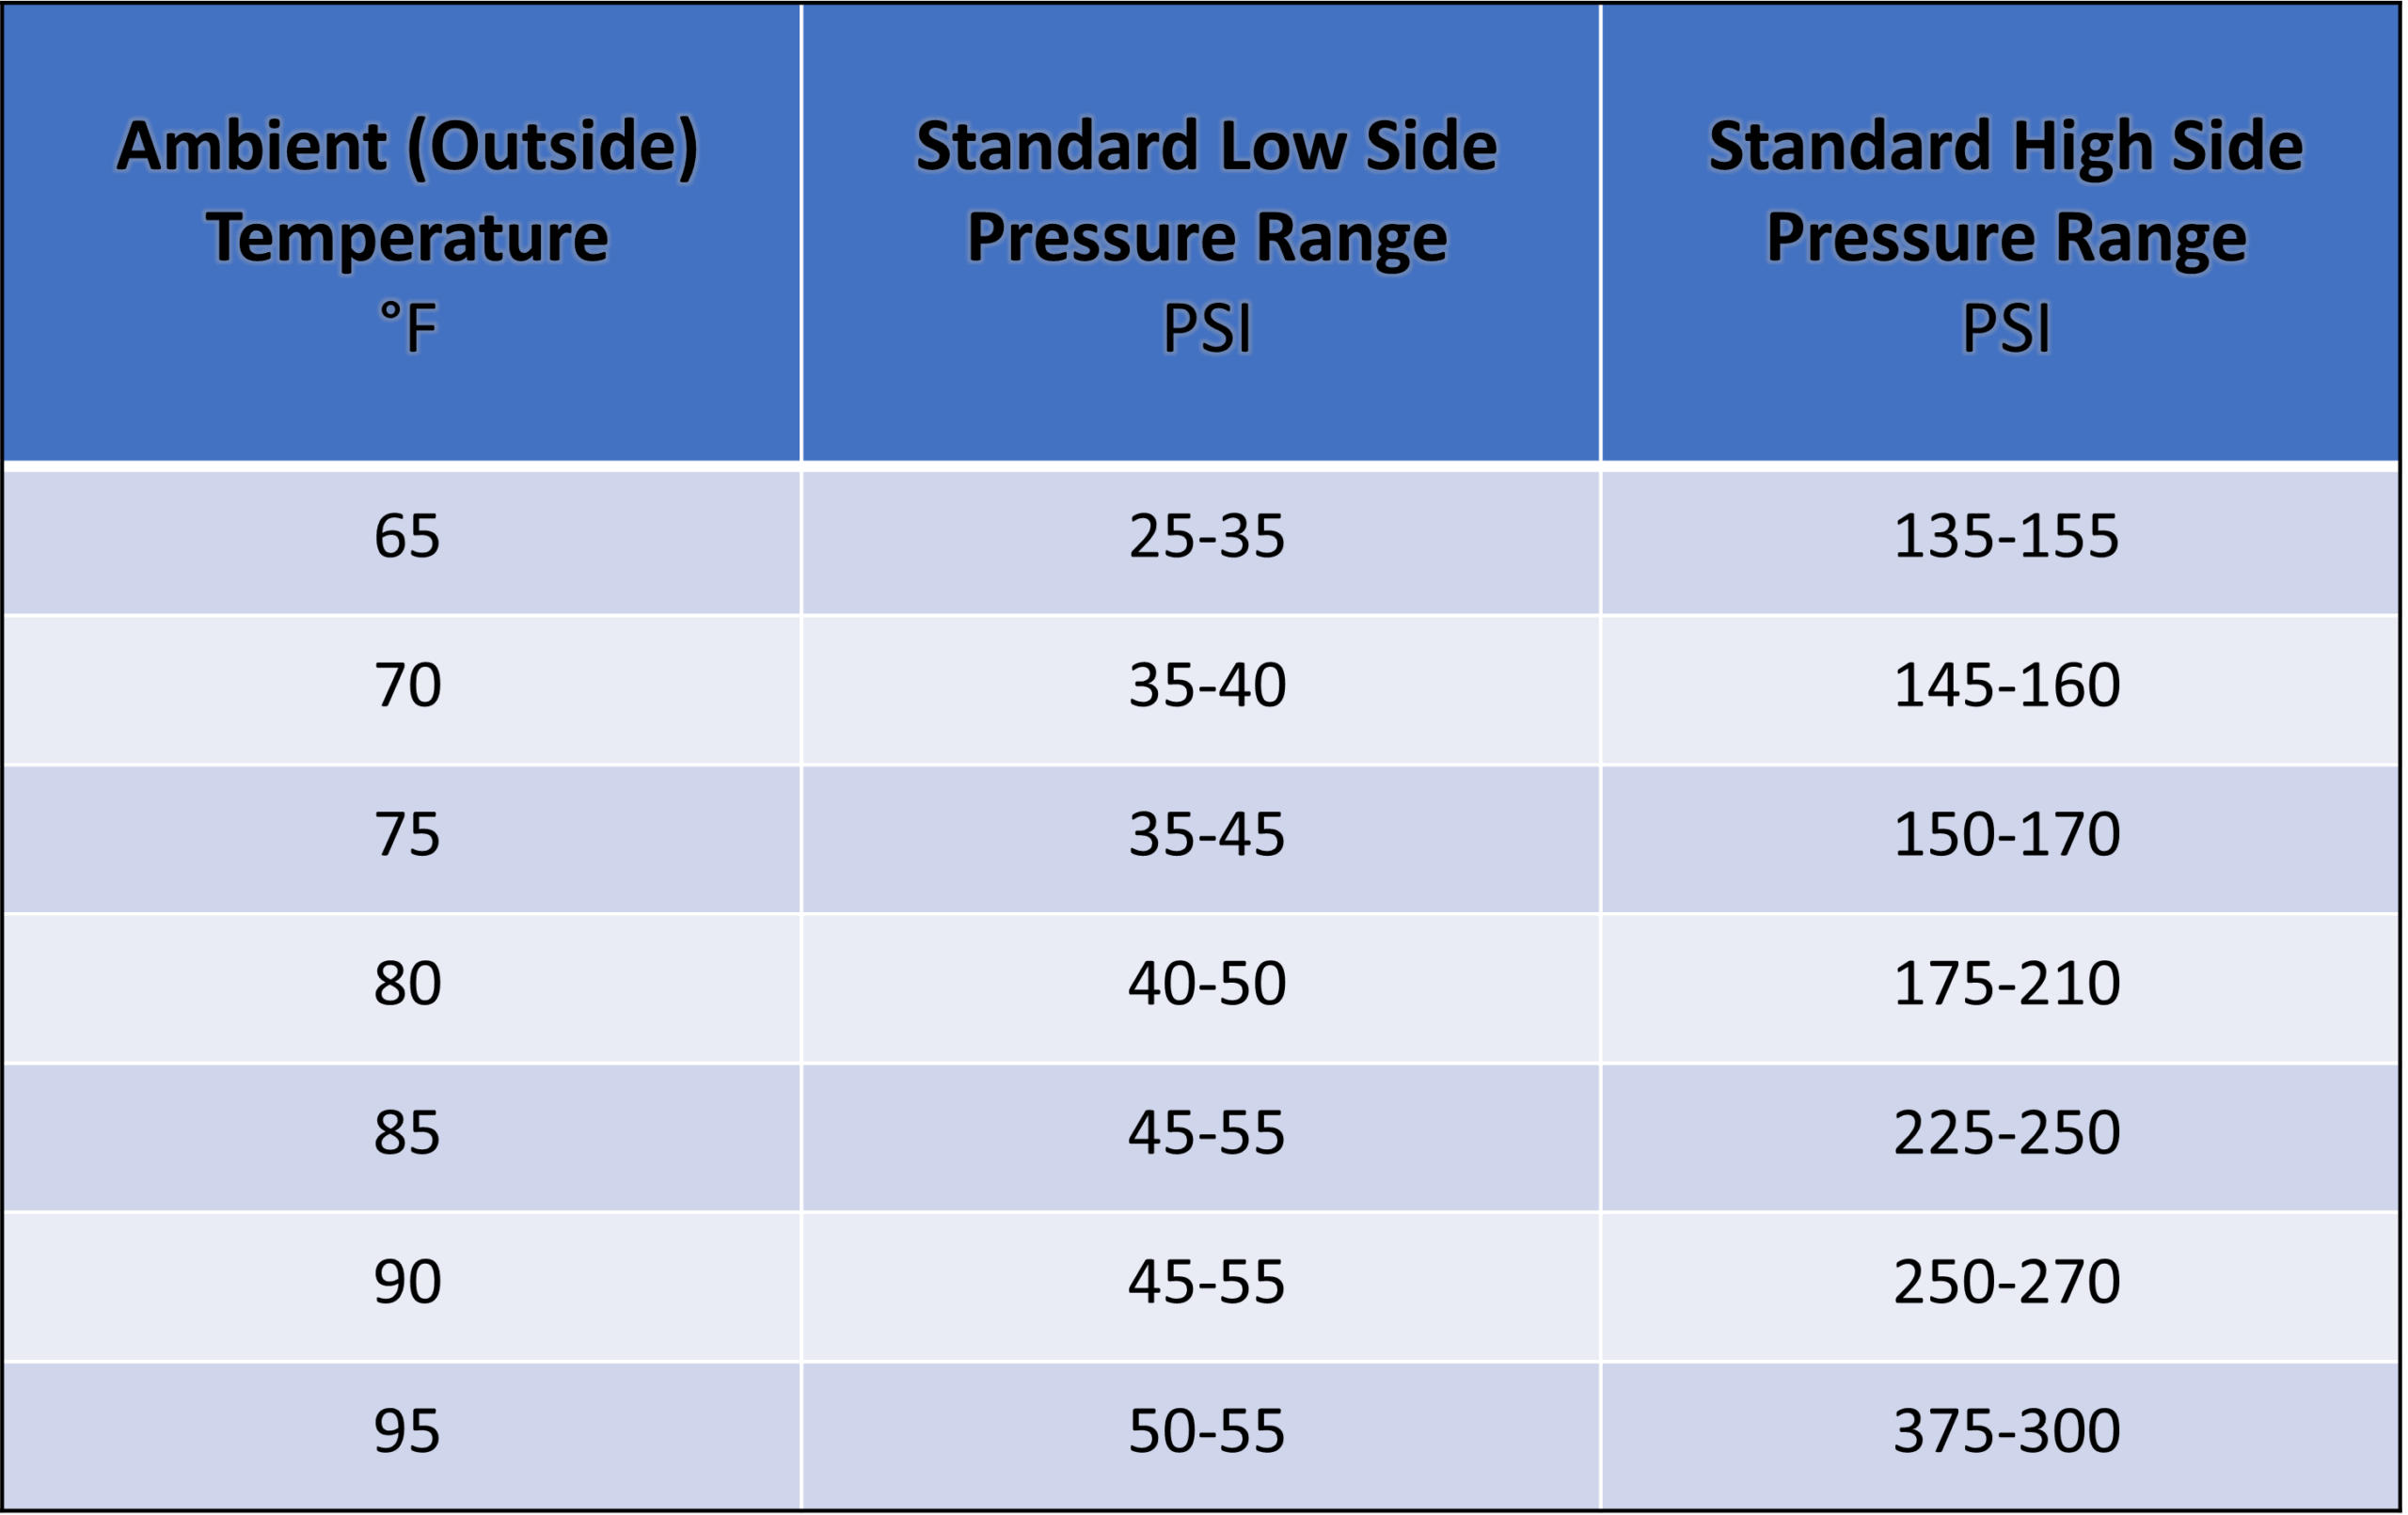
- Use gauges to get high and low side readings.
- Compare readings to chart’s expected ranges for ambient temperature.
- If pressures are outside range, follow recharge or leak-finding steps.
My shop rule:
- Always check electrical first. I’ve saved hours and a lot of refrigerant by finding a blown fuse early.

Preventive Maintenance Items on a Troubleshooting Chart
Good charts include maintenance tasks that prevent problems. These actions keep AC systems healthy and reduce visits to the shop.
Key preventive tasks:
- Replace cabin filter every 12,000 to 15,000 miles or yearly.
- Inspect belts and hoses for wear at regular service intervals.
- Run the AC regularly in winter to keep seals lubricated.
- Clean condensate drain to prevent odors and mold.
Preventive upkeep is cheaper than a full compressor or evaporator replacement. From experience, customers who follow routine care avoid most major repairs.
Limitations and Safety Notes for the Vehicle Ac Troubleshooting Chart
Charts help but don't replace hands-on diagnosis. They give likely causes, not absolute ones. Use them as a guide, not a final verdict.
Limitations:
- Charts are generic; model-specific quirks can vary.
- Electronic climate systems may need dealer-level tools.
- Refrigerant handling requires certification in many areas.
Safety tips:
- Wear eye protection when working with refrigerant.
- Never open the system without proper gauges.
- Avoid DIY refrigerant refills if unsure; improper charging can damage components.
Real-World Examples and Personal Experience
Example 1: Quick leak fix
- Symptom: AC blew warm air after a long drive.
- Chart pointed to low refrigerant. A UV dye test found a small leak at a hose clamp. Replacing the clamp and recharging fixed it.
Example 2: Electrical issue misread as refrigerant
- Symptom: Compressor not engaging.
- Chart recommended electrical checks first. A blown fuse was the cause. Replacing the fuse saved an unnecessary refrigerant test.
Lesson learned:
- Follow the chart stepwise. It prevents wasted parts and time.
People Also Ask (PAA-style Questions)
What is the first step when using a Vehicle Ac Troubleshooting Chart?
Start with visual and electrical checks to avoid unnecessary refrigerant work. Inspect filters, belts, fuses, and compressor engagement first.
How do I know if the AC problem is electrical or refrigerant?
If the compressor clutch never engages despite correct controls and fuses, it is likely electrical. If the clutch engages but cooling is poor, check refrigerant pressures.
Can a Vehicle Ac Troubleshooting Chart fix all AC issues?
A chart helps diagnose most common issues but not every case. Complex control module faults or sealed-system internal failures may need specialist tools.
Frequently Asked Questions of Vehicle Ac Troubleshooting Chart
What does a Vehicle Ac Troubleshooting Chart include?
A chart includes symptoms, likely causes, diagnostic checks, and recommended actions. It may also show expected pressure and voltage ranges.
How accurate are Vehicle Ac Troubleshooting Charts?
Charts are accurate when paired with proper testing and measurements. Accuracy improves with model-specific charts and correct tool use.
Do I need special training to use the chart?
Basic charts are easy to use, but working with refrigerants safely and legally often requires certification. Electrical checks are straightforward with basic skills.
How often should I consult the chart?
Consult it whenever you face an AC issue. Use it during routine maintenance to catch weak points early. It speeds diagnosis and reduces guesswork.
Can a chart replace professional diagnosis?
Charts guide you well but don't replace professional equipment or deep system knowledge. For complex or sealed-system repairs, a technician is recommended.
Conclusion
A Vehicle Ac Troubleshooting Chart is a practical tool that turns guesswork into clear steps. Use it to identify symptoms, run the right tests, and apply the correct fixes. Start with visual and electrical checks, follow pressure and temperature readings, and rely on the chart to prioritize repairs. Take action: print or download a chart for your vehicle, keep basic AC tools in your garage, and practice safe procedures. If you found this guide helpful, leave a comment, subscribe for more car maintenance tips, or try the chart on your next AC check.


