
Whirlpool Duet Dryer Troubleshooting often fixes common faults with simple, safe DIY steps and checks.
I’ve worked on dozens of Whirlpool Duet dryers and written repair guides for homeowners and techs. This article gives clear, tested Whirlpool Duet Dryer Troubleshooting steps, explains error codes, and shows when to DIY and when to call a pro. Read on for easy checks, real examples from my repair work, and practical tips you can use today.

Common Whirlpool Duet Dryer Troubleshooting Issues
Many owners see the same set of problems. These include no heat, poor drying, long cycles, loud noise, and error codes. Knowing the likely causes speeds repair and saves money.
Common causes to consider
- Vent blockage that reduces airflow and causes long dry times.
- Faulty heating element or thermal fuse causing no heat.
- Drum bearing or belt wear causing noise or poor tumbling.
- Moisture sensor or control board errors producing wrong cycle times.
Real-world example
I once fixed a Duet that ran 90 minutes to dry one load. The dryer had a packed vent and a clogged lint trap. After cleaning the vent and replacing the lint screen, dry time dropped to 45 minutes.
Why this matters
Proper Whirlpool Duet Dryer Troubleshooting protects your home from fire risk and keeps clothes in good shape. Start with easy checks and move to parts testing if the issue persists.
Step-by-step Whirlpool Duet Dryer Troubleshooting
Follow a clear order to rule out simple fixes before testing parts. This saves time and avoids unnecessary parts purchases.
Quick checklist to start
- Unplug the dryer or turn off its breaker before inspecting.
- Check the lint trap and clean it thoroughly.
- Inspect the vent hose and outside vent for obstructions.
- Feel the rear vent while running a heat cycle (careful — can be hot). Low airflow means a vent problem.
Testing for no heat
- Verify the dryer is receiving 240V at the terminal block. If not, check house fuses or breaker.
- Test the thermal fuse with a multimeter for continuity. A blown fuse usually means the vent was blocked long-term.
- Check the heating element for continuity. Replace if the coil is open.
- Inspect the high-limit thermostat and cycling thermostat for faults.
Fixing tumbling or noise problems
- Open the cabinet and check the drum belt for cracks or frays. Replace a worn belt.
- Spin the drum by hand and listen for rough bearings or rubbing. Replace rollers or glides when worn.
- Inspect the idler pulley and motor for unusual play or noise.
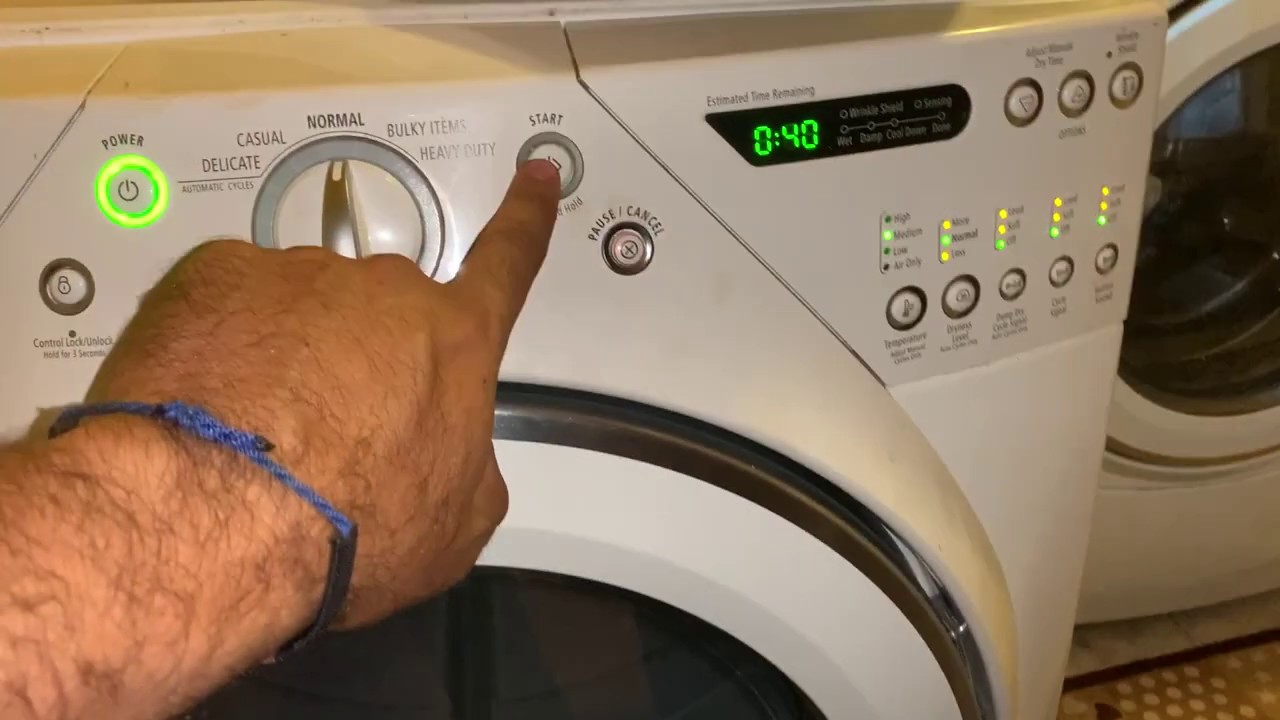
Control and sensor checks
- Run a diagnostic mode to read error codes. Use codes to pinpoint sensors or board issues.
- Clean the moisture sensors in the drum with vinegar or an abrasive pad if they show false readings.
- Reset the dryer by unplugging for one minute; this can clear transient control errors.
My tip from the field
Always clean the vent path first. Eight out of ten long-dry or overheating calls I handled were solved by vent cleaning alone.

Whirlpool Duet Dryer Troubleshooting: Error Codes Explained
Error codes give direct clues. Learn the common codes and what they mean so you can act fast.
Common codes and brief meanings
* F21 or F01: Control board fault or firmware glitch — try a reset, and check connections.
- F02 or F09: Shorted or stuck key — control panel issue; inspect or replace console board.
- F33 or F34: Moisture sensor short or open — clean sensors or replace wiring/sensor.
- E64 or F70: Heating system failure — check fuses, thermostats, element, and wiring.
How to read codes safely
- Enter diagnostic mode to show codes. Follow the manual steps for your exact model.
- Note the sequence and how often the code appears. Intermittent codes can be wiring or loose connector issues.
- Replace parts only after testing. A sensor may read bad but the real fault is a loose harness.
Practical example
I diagnosed an F70 error that turned out to be a failed thermal fuse after vent blockage. The code pointed to heat issues, and measuring continuity confirmed the fuse was open.
Maintenance and Prevention for Whirlpool Duet Dryer Troubleshooting
Routine care prevents many common failures. Small habits save time and money.
Simple maintenance tasks
- Clean the lint trap after every load. A clean screen improves airflow.
- Vacuum the lint trap cavity every month to remove hidden fibers.
- Inspect and clean the entire vent run yearly. Replace flexible plastic vents with rigid or semi-rigid metal for safety.
- Check the dryer leveling and supporting feet to reduce wear on rollers and belts.
Seasonal and safety checks
- Test the door switch and inspect the door seal annually to keep heat inside the drum.
- Replace the vent hose every few years if crushed or deteriorated.
- Install a vent cleaning brush or hire a chimney/vent service if the run is long or has many bends.
Lessons from my repairs
Many owners skip vent checks until a problem appears. I recommend scheduling vent cleaning every 1–2 years. That single step reduced repeat service calls in my work.
When to Call a Pro for Whirlpool Duet Dryer Troubleshooting
Some problems need tools and training. Know when DIY ends and professional service begins.
Call a technician when
- You suspect a gas leak or smell gas. Safety first — get an expert.
- The dryer has electrical issues beyond checking a breaker and outlet.
- You need to replace the drum bearing, motor, or control board and lack tools or experience.
- The problem is intermittent and diagnostic codes don’t match simple fixes.
How a pro helps
- A technician can run advanced electrical tests, update control firmware, and source OEM parts.
- Pros also inspect vent runs with cameras and check for hidden damage that a homeowner may miss.
My rule of thumb
If a repair requires disassembling the drum or testing high-voltage parts, call a pro. It’s safer and often faster.

Frequently Asked Questions of Whirlpool Duet Dryer Troubleshooting
Why does my Whirlpool Duet dryer not heat?
Most often due to a blown thermal fuse, faulty heating element, or blocked vent. Check airflow and test fuses and the element with a multimeter.
What does the F21 code mean on my Duet dryer?
F21 usually points to a control board or keypad fault. Try resetting the dryer and checking console wiring; replace the control board if the fault persists.
How often should I clean the dryer vent?
Clean the lint trap after every load and the full vent run at least every 1–2 years. Clean more often if you see lint escaping or the dryer runs longer.
Can I replace the drum belt myself?
Yes, a confident DIYer can replace a belt with basic tools and safety steps. Unplug the dryer, follow a guide, and keep track of belt routing.
My dryer tumbles but won’t dry. What should I check first?
Check the vent for blockages, the lint screen, and the heating element or thermal fuse. Poor airflow or a failed heating system are the usual culprits.
Conclusion
Whirlpool Duet Dryer Troubleshooting starts with simple checks: clean the lint trap, inspect the vent, and run diagnostics. Move on to measured tests for fuses, elements, sensors, and boards only after ruling out airflow and power problems. Keep a regular maintenance routine to avoid most failures and know when to call a professional for high-voltage or gas issues. Try the steps here, leave a comment about your model and symptoms, and subscribe for more repair how-tos and safety tips.

