
Whirlpool Range troubleshooting codes identify faults quickly so you can fix or call service.

Today's Exclusive Deals
Limited-time Exclusive Deals. Check current discount on Amazon.
Check Price on Amazon As an Amazon Associate I earn from qualifying purchases.I have repaired and diagnosed dozens of Whirlpool ranges over the years. This guide explains Whirlpool Range Troubleshooting Codes clearly. You will learn what common codes mean, safe steps to test parts, and when to call a pro. I blend hands-on experience with service knowledge so you can act with confidence.

How Whirlpool Range Troubleshooting Codes Work
Whirlpool Range Troubleshooting Codes are short alphanumeric messages that tell you what part of the range needs attention. They come from the range control board. The board runs self-tests and reports faults as F-codes, E-codes, or temperature readouts like Lo and Hi. Reading these codes helps you find the root cause faster and avoid unnecessary part swaps.
Today's Exclusive Deals
Limited-time Exclusive Deals. Check current discount on Amazon.
Check Price on Amazon As an Amazon Associate I earn from qualifying purchases.- Purpose of codes
- Identify faults quickly.
- Point to sensors, elements, or control problems.
- Help technicians diagnose without guesswork.
- Where codes appear
- On the control display.
- During startup or during oven cycles.
- After a power interruption or failed self-test.
Practical tip: Always write down the exact code and the conditions when it appeared. This saves time when searching manuals or talking to tech support.

Common Whirlpool Range Codes and What They Mean
Below are common Whirlpool Range Troubleshooting Codes and likely causes. Codes can vary by model, so treat these as general guidance.
Today's Exclusive Deals
Limited-time Exclusive Deals. Check current discount on Amazon.
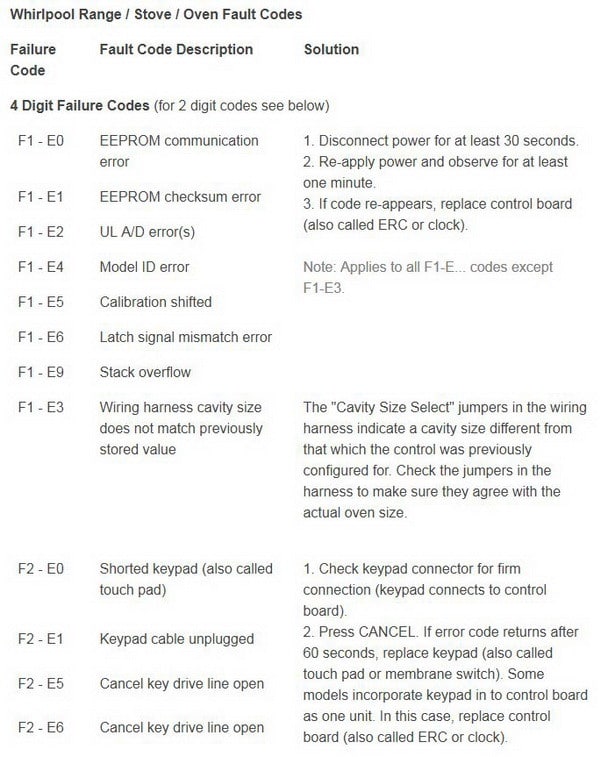
Check Price on Amazon As an Amazon Associate I earn from qualifying purchases.- F1 or F1E0
- Likely indicates a control board or memory error.
- Try a power reset; persistent F1 usually needs service.
- F2 or F2E0
- Often tied to keypad or touchpad faults.
- Check for stuck keys, moisture, or failed user interface.
- F3 or F3E0
- Frequently a door latch or electronic lock problem on self-cleaning ovens.
- Inspect the latch and door switches.
- F5 or F5E0
- Common for function or relay failures controlling elements.
- Could be a relay on the control board or wiring fault.
- F6 or F6E0
- Typically points to the oven temperature sensor circuit.
- Sensor open, shorted, or connector loose.
- Lo or Hi
- Low or high oven temperature reading.
- Check sensor resistance and oven calibration.
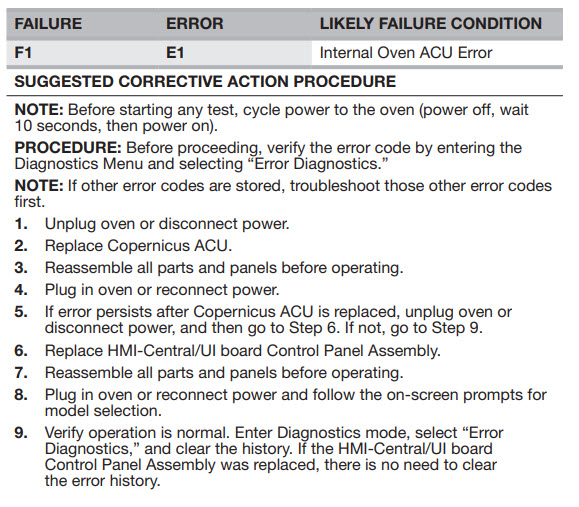
- E0 or E1
- Sensor open (E0) or short (E1) in many models.
- Confirm sensor continuity with a multimeter.
Example context: If you see F6 followed by Lo, the sensor likely reads a temperature out of range or is disconnected. Replace or test the sensor before replacing the board.
Step-by-Step Whirlpool Range Troubleshooting Codes Process
Follow this simple process when you see a code. Keep safety first.
- Safety first
- Turn off power at the breaker.
- Unplug the range if possible.
- Record the code
- Write down the exact code and when it occurred.
- Note recent events like power outages or storms.
- Reset power
- Switch the breaker off for 30 seconds then on.
- Sometimes the code clears after a reset.
- Run a diagnostic cycle
- Many Whirlpool ranges have a diagnostic or service mode.
- Consult your manual or try common key combos to enter diagnostics.
- Inspect visible parts
- Look for burned wires, loose connectors, or water near the control panel.
- Check the oven door latch and hinges.
- Test sensors and elements
- Use a multimeter to check the temperature sensor resistance. Typical resistance is around 1,000 ohms at room temp but varies by model.
- Test bake and broil elements for continuity.
- Replace only what you test
- Do not replace the control board unless tests point to it.
- Replace sensors, elements, or switches that fail continuity tests.
- Call a technician if needed
- If codes return after parts swaps or diagnostics fail, call certified service.

How to Enter Diagnostic Mode (General Guidance)
Diagnostic procedures differ by model, but a few patterns appear across Whirlpool ranges.
- Common method
- Press and hold BAKE and BROIL (or BAKE and CONVECTION) for 3–5 seconds.
- Some models require a sequence like OFF, BAKE, BROIL, then OFF.
- What happens in service mode
- The display may show a sequence of codes.
- You can run tests for sensors, relays, and elements.
- Caution
- If unsure, check your model’s manual. Entering service mode and changing settings can alter range behavior.

Troubleshooting Specific Components Tied to Codes
Linking codes to parts reduces guesswork.
- Temperature sensor
- Symptom: F6, Lo, Hi, or E0/E1 codes.
- Test: Unplug sensor and measure resistance. Replace if out of spec.
- Control board
- Symptom: F1, random errors, or unresponsive panel.
- Test: Inspect for burnt traces or swollen components. Swap only after testing other parts.
- Keypad or user interface
- Symptom: F2, unresponsive buttons, or ghost presses.
- Test: Remove control panel and inspect ribbon cable. Replace keypad if needed.
- Oven elements
- Symptom: Uneven heating with F5-like codes.
- Test: Check for continuity and visible breaks. Replace failed elements.
- Door latch and lock
- Symptom: F3 or lock errors during self-clean.
- Test: Verify latch moves freely and door switches close properly.

Preventive Maintenance to Reduce Codes
Small habits prevent many Whirlpool Range Troubleshooting Codes.
- Keep the control panel dry and clean.
- Avoid slamming the oven door.
- Clean spills promptly to prevent moisture on switches.
- Run a self-clean only when you can monitor the process.
- Have a trained tech inspect the range every few years.
Personal Experience and Practical Tips
I once diagnosed a stubborn F6 code that returned after replacing the sensor. I rechecked wiring and found a corroded connector. Cleaning and re-seating the connector fixed it. Lesson learned: always test wiring and connectors before swapping major parts.
Another time, a customer had repeated F2 codes caused by a stuck touchpad from a spilled liquid. Gentle cleaning and drying fixed it. Avoid rushing to replace boards. Test small, inexpensive parts first.

When to Call a Technician
Call a pro if any of these apply:
- The code persists after a power reset and basic checks.
- You find burnt wiring or an obvious short.
- The control board shows visible damage.
- You are not comfortable working with live electrical components.
A certified technician has the tools to run model-specific diagnostics and to source the correct parts.
Frequently Asked Questions of Whirlpool Range Troubleshooting Codes
What does F6 mean on my Whirlpool range?
F6 commonly points to the oven temperature sensor circuit or a related communication fault. Test the sensor resistance and wiring before replacing the control board.
How do I clear a Whirlpool Range Troubleshooting Codes error?
Try a power reset by switching the breaker off for 30 seconds. If the code returns, follow the diagnostic steps and test the suspected parts.
Can I keep using the oven when I see a code?
It depends on the code. Temperature or sensor codes may affect cooking accuracy. Electrical or control board errors may pose safety risks. When in doubt, stop use and get an inspection.
How do I test the oven temperature sensor?
Unplug power, access the sensor at the back of the oven, and measure resistance with a multimeter. Compare the reading to the expected range in your manual.
Are code meanings the same for all Whirlpool models?
No. Codes follow general patterns, but meanings can vary by model and year. Always check model-specific documentation for exact code definitions.
Conclusion
Whirlpool Range Troubleshooting Codes give clear clues to faults. Read and record the code, follow safety steps, and test sensors, elements, and wiring before replacing major parts. Use diagnostics to narrow the issue, and call a certified technician if the problem persists or involves electrical damage. Start with small tests, stay safe, and act with the confidence that comes from methodical checks. Try these steps on your range today, subscribe for more appliance tips, or leave a comment with your specific code for personalized help.


