
Most Rain Bird solenoid valve problems are solvable with cleaning, electrical checks, or diaphragm replacement.

Today's Exclusive Deals
Limited-time Exclusive Deals. Check current discount on Amazon.
Check Price on Amazon As an Amazon Associate I earn from qualifying purchases.I’ve spent years fixing irrigation gear. I know Rain Bird solenoid valve troubleshooting inside and out. This guide walks you step by step through common symptoms, electrical checks, mechanical fixes, and maintenance tips. Read on to get clear, practical fixes you can do today and to avoid repeat problems tomorrow.
Common symptoms and what they mean
Rain Bird solenoid valve troubleshooting starts with spotting the symptom. A valve that won’t open, drips when closed, cycles randomly, or runs weakly points to different causes. Keep observations short and specific. Note when the problem happens, after rain, after system runs, or after power events.
Today's Exclusive Deals
Limited-time Exclusive Deals. Check current discount on Amazon.
Check Price on Amazon As an Amazon Associate I earn from qualifying purchases.Common symptoms include:
- Valve will not open at all.
- Valve opens but has low or uneven flow.
- Valve keeps running after the zone turns off.
- Valve leaks or drips when closed.
- Valve hums or buzzes but does not actuate.
These symptoms guide the troubleshooting path. Use them to pick electrical tests or mechanical checks next. The same symptom can have multiple causes, so follow each step methodically.

Today's Exclusive Deals
Limited-time Exclusive Deals. Check current discount on Amazon.
Check Price on Amazon As an Amazon Associate I earn from qualifying purchases.Quick tools and safety checklist
Rain Bird solenoid valve troubleshooting is easier with a few tools. You don’t need a full shop. Gather these before you start.
Essential tools:
- Multimeter for voltage and continuity.
- Small flat-head screwdriver and needle-nose pliers.
- Soft brush and clean rag for debris.
- Replacement diaphragm and solenoid (model-specific).
- Bucket or towels to catch water.
Safety first. Turn off the controller and shut water at the main before working on a valve. Test electrical circuits only when power is applied and follow basic electrical safety. If you are unsure, call a pro.

Initial quick checks (fast wins)
Start with simple checks for fast results. Many Rain Bird solenoid valve troubleshooting calls end here.
Steps:
- Check the controller: Confirm the zone is scheduled and test manual run from the controller.
- Inspect fuse or breaker: Look for blown fuses or tripped breakers.
- Check wiring: Look for disconnected or chewed wires at the valve.
- Verify voltage: Use a multimeter at the solenoid terminals while the valve is commanded on; you should see 20–24 VAC on most Rain Bird systems.
If voltage is present and the valve does not open, move to mechanical checks. If voltage is absent, trace wiring back to the controller.

Electrical troubleshooting in detail
Electrical faults cause many failures. This stage narrows down whether the issue is controller, wiring, or solenoid.
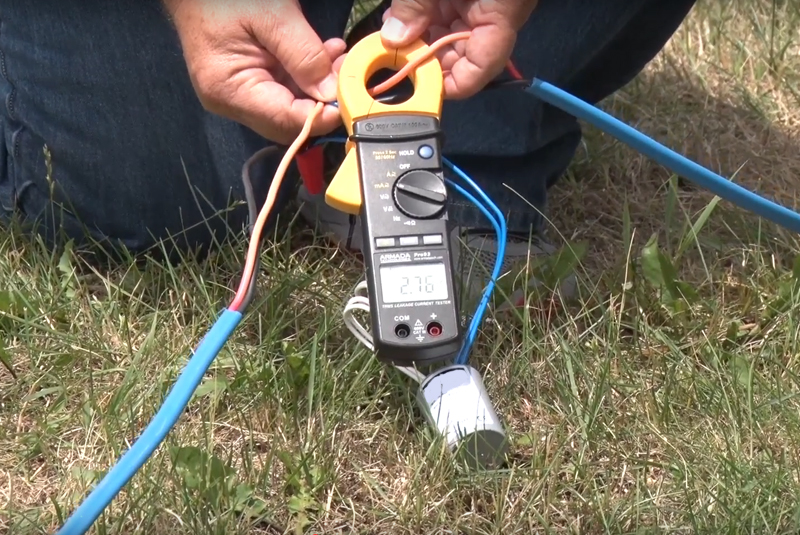
Test steps:
- Measure open-circuit voltage at the controller station output.
- Measure voltage at the valve solenoid while the controller runs that zone.
- Check coil resistance with a multimeter. A typical Rain Bird solenoid coil reads roughly 20–40 ohms depending on model. Consult your model specs.
- Test for short circuits by checking resistance between coil wires and ground. Infinite or very high resistance is normal; near zero may indicate a short.
Common fixes:
- Replace burned controller output or blown fuse.
- Repair damaged wiring, splice with waterproof connectors.
- Replace the solenoid if the coil fails resistance tests.
Document your voltage and resistance readings. Good notes help if you call a technician.
Mechanical troubleshooting: valve internals
If electricals check out, the problem is probably inside the valve body. Rain Bird solenoid valve troubleshooting often points to debris, worn diaphragms, or stuck parts.
Open and inspect:
- Turn off water and unscrew the bonnet. Keep parts in order.
- Remove debris from filter screen and flow passages.
- Check the diaphragm for cracks, holes, or stiffness. Replace if torn or misshapen.
- Inspect the pilot assembly and plunger. Clean and ensure free movement.
Replace parts with Rain Bird OEM pieces when possible. A new diaphragm often fixes slow opening, drips, and incomplete closure.

Step-by-step repair guide
Follow this simple repair flow to resolve most issues.
- Isolate and power: Turn off water and disable controller zone.
- Test power: Confirm 24 VAC at solenoid when the zone is on.
- Remove solenoid: Unscrew it to test valve operation by hand.
- Manually lift diaphragm or plunger: If valve opens, the solenoid or diaphragm may be bad.
- Clean internals: Remove debris and flush the valve body.
- Replace diaphragm: Install new diaphragm and reassemble.
- Re-test: Restore power and run manual zone test.
Work methodically and test after each step. If a step doesn’t change the symptom, move to the next.

Parts, replacements, and compatibility
Using the right parts speeds repairs and reduces repeats. For Rain Bird solenoid valve troubleshooting, know model numbers.
Tips:
- Match diaphragm and bonnet to the valve model (e.g., 100-DV, PEB series).
- Use factory solenoids or high-quality aftermarket parts with the same specs.
- Keep spare diaphragms and solenoids on hand if you manage a large system.
Note part life: diaphragms wear from sun, chemicals, and debris. Expect replacement every few years in heavy-use systems.
Preventive maintenance to avoid repeat problems
Good upkeep reduces Rain Bird solenoid valve troubleshooting time later. Schedule simple checks each season.
Maintenance tasks:
- Run each zone monthly to verify operation.
- Inspect and clean filters and screens seasonally.
- Replace diaphragms proactively every 2–4 years in dirty water.
- Label valves and wiring for quick identification during repairs.
A short maintenance list saves hours later. I learned this after fixing the same leaking valve three times. Labeling cut my repair time in half.
When to call a professional
Some issues need a pro. Know your limits to avoid bigger damage.
Call a pro for:
- Repeated electrical board failures.
- Complex wiring across many zones.
- Mainline pressure problems or broken plastic mains.
- When you lack tools or time.
Professional techs can run pressure tests, replace controllers, and handle warranty issues. A good contractor will also document work and recommend upgrades.
Common mistakes to avoid
Avoid these errors I’ve seen often while doing Rain Bird solenoid valve troubleshooting.
Mistakes:
- Replacing diaphragm without cleaning debris first.
- Assuming lack of flow is always a valve issue; check sprinklers and filters.
- Using incorrect replacement parts.
- Skipping voltage checks and replacing the valve unnecessarily.
Learning from mistakes saves money. I once replaced a valve diaphragm twice because I didn’t clear a blocked inlet. Lesson learned: clean first.
People also ask (PAA-style)
Why won’t my Rain Bird valve open when controller runs?
Check for 24 VAC at the solenoid. If voltage is present, inspect the diaphragm and clear debris inside the valve.
Why does my Rain Bird valve hum but not open?
A humming solenoid often has power but a stuck plunger or clogged pilot. Clean the solenoid and valve internals or replace the solenoid.
How do I test a Rain Bird solenoid?
Use a multimeter to measure coil resistance and measure voltage at terminals while the zone runs. Replace if resistance is out of spec or no voltage is present.
Frequently Asked Questions of Rain Bird Solenoid Valve Troubleshooting
What is the first thing to check when a Rain Bird valve won’t open?
Check the controller schedule and then measure voltage at the solenoid while the zone is running. Confirm 20–24 VAC before moving to mechanical checks.
Can a dirty diaphragm cause low flow?
Yes. A dirty or damaged diaphragm can prevent full opening, causing low or uneven flow. Clean or replace the diaphragm to restore flow.
How do I know if the solenoid is bad?
Measure coil resistance and test for 24 VAC during a run. If voltage is present and the coil shows open circuit or extreme resistance, the solenoid is bad.
How often should I replace valve diaphragms?
Replace diaphragms every 2–4 years in typical use, or sooner in harsh water conditions. Inspect yearly to catch wear early.
Is it safe to work on irrigation valves myself?
Yes, for basic checks and part swaps if you follow safety steps: shut off water and power, use insulated tools for electrical tests, and follow manufacturer guidance.
What causes a valve to stay open after the zone turns off?
Stuck pilot parts, a torn diaphragm, or debris in the valve can keep it open. Check the pilot and diaphragm and clean the valve body.
Can low system pressure affect valve operation?
Yes. Low supply pressure can prevent valves from opening fully, leading to weak flow. Test system pressure and check for leaks on the mainline.
Conclusion
Rain Bird solenoid valve troubleshooting is a mix of quick checks and careful inspection. Start with the controller and voltage tests, then move to cleaning and diaphragm checks. Keep basic tools and replacement parts on hand. Regular maintenance and clear labeling will save time and money. Try the step-by-step tests here and leave a comment with your symptom if you need help diagnosing a tricky valve.


