
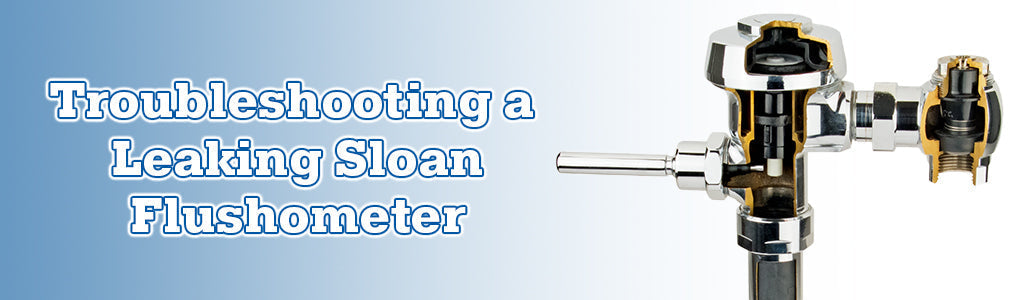
Sloan Royal Flush Valve Troubleshooting is usually fixable by cleaning or replacing the diaphragm or seals.
I have worked on commercial restrooms and repaired dozens of Sloan Royal flush valves. This guide explains Sloan Royal Flush Valve Troubleshooting clearly and simply. You will get step-by-step fixes, parts to check, and real tips I learned on the job. Read on to save time, avoid common mistakes, and restore reliable flushing fast.

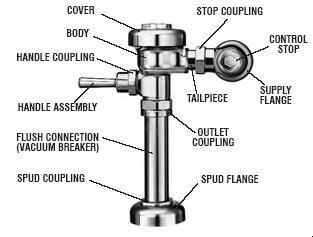
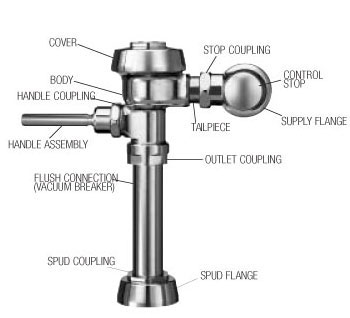
How Sloan Royal Flush Valves Work
A Sloan Royal flush valve controls water release from the supply to the bowl. It uses a piston or diaphragm assembly, a valve seat, and seals to meter flow. When you activate the valve, pressure shifts the diaphragm or piston and allows a timed flush. Understanding these parts makes Sloan Royal Flush Valve Troubleshooting faster and more accurate.

Common Problems and Symptoms
Most service calls involve a few repeat issues that point to the same root causes. Here are common symptoms and what they usually mean.
- Constant running water. This usually means a worn diaphragm or leaking seat.
- Weak or partial flush. This often indicates low supply pressure or a clogged inlet screen.
- Slow refill or noisy valve. Mineral build-up or damaged vacuum breaker parts are common causes.
- Handle or sensor sticking. Debris, misalignment, or failed internal springs can cause this.
Spotting the symptom helps you choose the right Sloan Royal Flush Valve Troubleshooting steps quickly.
Step-by-step Troubleshooting and Repair
Use these steps for systematic Sloan Royal Flush Valve Troubleshooting. Work slowly and test after each change.
- Turn off the water supply. This prevents mess and protects parts.
- Remove the cover or handle assembly. Follow the valve trim removal process.
- Inspect the inlet screen and clean it if clogged. Small debris will reduce flow.
- Check the diaphragm or piston assembly. Look for tears, hardening, or deformation.
- Replace worn gaskets, seals, or the diaphragm kit. Rebuild kits fix most leaks.
- Reassemble and turn on water slowly. Watch for leaks and proper flush action.
- Test multiple cycles and check flush volume and refill speed. Adjust if needed.
PAA-style question: Why is my Sloan Royal valve leaking after a rebuild?
- A bad leak after rebuild usually means the seat or gasket wasn't seated properly, or the diaphragm is installed upside down.
PAA-style question: How do I adjust flush volume on a Sloan Royal?
- Adjust volume by changing the timing diaphragm or the inlet adjustment screw on models that allow it. For many Royal valves, use the manufacturer’s adjustment or a different piston kit.

Common Replacement Parts and When to Replace
Knowing which parts to carry saves time during repair. Here are the usual replacements for Sloan Royal Flush Valve Troubleshooting.
- Diaphragm repair kit. Replace at first sign of cracking or stiffness.
- Piston assembly. Replace if scoring, wear, or failed seals are visible.
- Seat or gasket. Replace if the valve will not hold or if you see corrosion.
- Vacuum breaker components. Replace when leaks or backflow concerns persist.
- Trim and handle parts. Replace when the actuator is loose or broken.
Replace parts when cleaning and simple adjustments fail to restore function.
Maintenance Tips and Best Practices
Routine care reduces future Sloan Royal Flush Valve Troubleshooting calls. Keep your valves working with these simple habits.
- Inspect valves quarterly in high-use restrooms. Early detection prevents failures.
- Flush supply lines before installing a new valve. This clears debris that can damage parts.
- Use a rebuild kit on a schedule based on traffic. Heavy use may need yearly attention.
- Avoid petroleum-based lubricants. Use plumber-approved silicone when needed.
- Keep an inventory of common parts. A diaphragm kit, gaskets, and o-rings save service trips.
Small, regular steps keep flush valves reliable and lower long-term costs.

Troubleshooting Examples from My Experience
I once fixed a busy airport restroom that had a persistent weak flush. I cleaned the inlet screen and replaced a brittle diaphragm. Problem solved in under 30 minutes. From that job I learned to always check the screen and diaphragm before deeper disassembly.
Another time I over-tightened the bonnet and warped a seat. That taught me to follow torque guidance and test carefully. These hands-on lessons shape how I approach Sloan Royal Flush Valve Troubleshooting today.
Technical Tips and Tools
A few tools and techniques make Sloan Royal Flush Valve Troubleshooting swift and safe.
- Tools to have: adjustable wrench, screwdrivers, small pick, pick-up tool, torque wrench, and flashlight.
- Testing gear: pressure gauge and bucket for flow checks.
- Work method: turn off water, relieve pressure, and keep parts organized in order.
- Lubrication: use a plumber-approved silicone grease sparingly on o-rings only.
- When to call a pro: if you see corrosion inside the body or suspect supply pressure issues beyond the valve.
These tips reduce surprises during repairs and protect the valve components.

Frequently Asked Questions of Sloan Royal Flush Valve Troubleshooting
What causes a Sloan Royal flush valve to keep running?
A running valve often comes from a torn diaphragm or a leaking seat. Replace the diaphragm kit and inspect the valve seat for damage.
Can I clean and reuse the diaphragm?
Minor deposits can be cleaned, but a diaphragm that is stiff or has any crack should be replaced. New diaphragms are inexpensive and more reliable.
How long does a Sloan Royal flush valve last with regular maintenance?
With routine care, these valves can last many years; heavy-use sites may need parts replaced every 1 to 3 years. Regular inspections extend service life.
Is water pressure a common cause of poor flushing?
Yes. Low supply pressure or clogged inlet screens reduce flush strength. Check line pressure and clean screens during troubleshooting.
Do I need special tools to replace a piston or diaphragm?
Basic plumbing tools usually suffice for Sloan Royal Flush Valve Troubleshooting. A torque wrench and pressure gauge help for precise work.
Will mineral buildup ruin my Sloan Royal valve?
Mineral buildup reduces performance and can score moving parts over time. Regular cleaning and water treatment reduce the risk.
Conclusion
Sloan Royal Flush Valve Troubleshooting is mostly about methodical checks: inspect, clean, replace worn parts, and test. Start with the simple fixes I outlined, such as cleaning screens and replacing the diaphragm kit. With routine maintenance and the right parts on hand, you can keep valves running reliably and avoid repeat repairs. Try one repair this week, track the result, and consider stocking a rebuild kit to save time on future calls. If you found this guide useful, subscribe for more tips, or leave a comment with your valve issue and I’ll help troubleshoot.

