
Most condensate pump problems stem from clogs, float switch faults, or simple power issues.
I’ve worked on HVAC systems for years and have diagnosed hundreds of condensate pump issues. This guide on Condensate Pump Troubleshooting distills that experience into clear, step-by-step checks, practical fixes, and safety tips. Read on to learn how to find the root cause, make confident repairs, and avoid common mistakes when handling condensate pump troubleshooting.
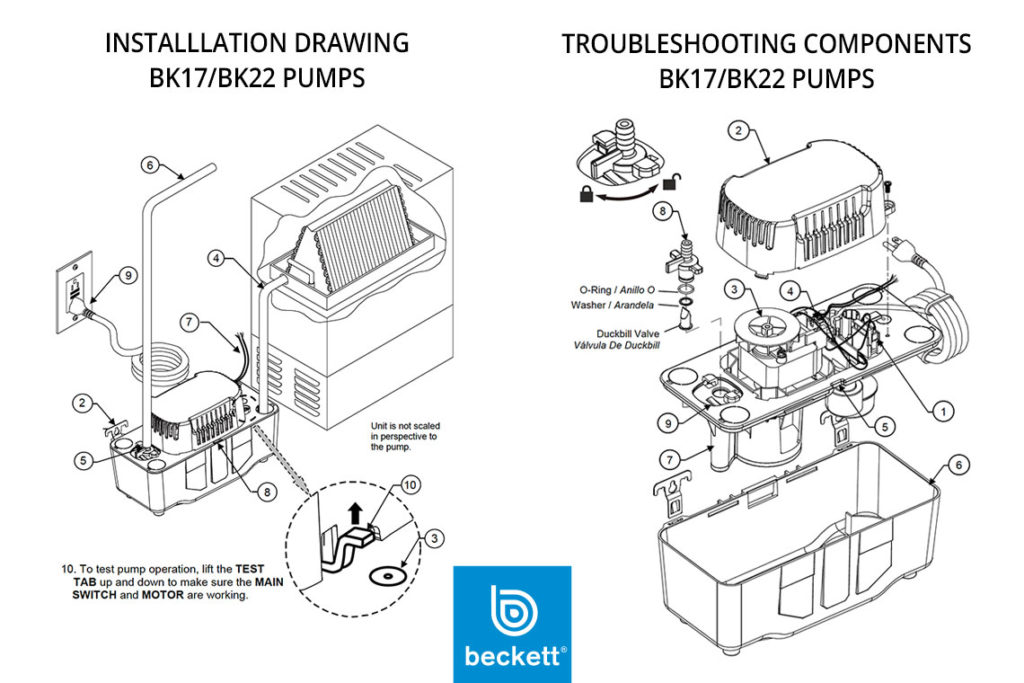
What is a Condensate Pump and why troubleshooting matters
A condensate pump moves water from HVAC equipment to a drain when gravity drain is not available. Condensate Pump Troubleshooting helps keep HVAC systems running safely and prevents water damage. A faulty pump can shut down equipment, trigger error codes, and cause mold or structural harm. Knowing how to troubleshoot saves time and money.

Common problems and root causes
Condensate Pump Troubleshooting focuses on these common faults:
- Clogged drain or tubing. Debris or algae can block flow and stop the pump from emptying.
- Stuck or faulty float switch. If the float won’t rise or the switch is bad, the pump won’t start.
- Power issues. Tripped breakers, blown fuses, or loose wiring can cut power.
- Pump motor failure. Bearings or windings can seize after years of use.
- Check valve or discharge blockage. Backflow or partial blockages reduce efficiency.
Each cause shows specific symptoms. When you spot the symptom, use targeted Condensate Pump Troubleshooting to fix it quickly.
Tools, safety, and prep for troubleshooting
Before starting Condensate Pump Troubleshooting, gather basic tools and follow safety steps:
- Tools to have:
- Screwdrivers and pliers.
- Multimeter for voltage and continuity checks.
- Wire nuts and electrical tape for minor repairs.
- Wet/dry vacuum or tubing snake for clogs.
- Safety steps:
- Turn off power at the breaker or disconnect switch.
- Wear gloves and safety glasses.
- Place towels or a bucket to catch water.
- Prep steps:
- Note model and specs on the pump label.
- Have replacement tubing and a new pump on hand if needed.
Safe, planned Condensate Pump Troubleshooting cuts repair time and avoids accidents.

Step-by-step condensate pump troubleshooting checklist
Follow these steps for focused Condensate Pump Troubleshooting:
- Visual inspection
- Check for water around the unit and the pump reservoir.
- Look for cracked tubing, loose fittings, and corroded terminals.
- Test power
- Confirm breaker and disconnect are on.
- Use a multimeter to check for voltage at the pump terminals.
- Check the float switch
- Manually raise the float; listen for the pump motor.
- If nothing happens, test switch continuity with a multimeter.
- Inspect and clear clogs
- Remove and clean the pump reservoir.
- Use a wet/dry vac on the drain line or a small snake to clear algae and debris.
- Test pump motor
- If pump has power and float switch closes, but motor is silent, motor likely failed.
- Replace pump motor or entire pump assembly.
- Verify discharge and check valve
- Ensure the discharge line is clear to the drain point.
- Replace a failing check valve to stop backflow.
These steps form a fast workflow for most Condensate Pump Troubleshooting jobs. Work through them in order to rule out simple fixes first.

Repair and maintenance tips that work
Routine maintenance prevents most condensate pump failures. Try these practical tips for Condensate Pump Troubleshooting and care:
- Clean the reservoir every 3 to 6 months. This prevents slime and scale.
- Use a biocide tablet or algaecide in the drain pan where appropriate.
- Replace tubing every few years if it becomes brittle or kinked.
- Test the float switch during seasonal HVAC service checks.
- Keep the pump elevated slightly to avoid silt build-up.
From my experience, a short quarterly check saves emergency service calls and keeps systems healthy.

When to repair, replace, or call a pro
Deciding whether to DIY or hire a technician is part of effective Condensate Pump Troubleshooting:
- Repair at home when the issue is a clog, loose wire, or a cheap replaceable pump. These fixes are safe for a handy homeowner.
- Replace the pump when the motor fails or the housing is cracked. Modern pumps are affordable and come as easy swap units.
- Call a professional when wiring is complex, the pump is hardwired into control systems, or when you suspect broader HVAC faults. Certified techs can diagnose control board issues and ensure code compliance.
If you feel unsure at any step, a quick call to a trusted HVAC pro avoids costly mistakes.

Common mistakes, lessons learned, and real-world tips
I once replaced a pump only to see it fail in a month. I learned two lessons: always double-check the float switch and confirm discharge line integrity. Other common mistakes:
- Replacing only the pump without clearing the drain line.
- Forgetting to restore proper incline in discharge tubing.
- Using the wrong voltage or ignoring motor nameplate specs.
My best tip: run a full system test after repair. Fill the reservoir and watch for repeat issues. This simple test avoids repeat service calls and gives confidence your Condensate Pump Troubleshooting worked.

People Also Ask (PAA-style questions)
How long should a condensate pump last?
Most condensate pumps last 5 to 10 years with proper maintenance. Harsh conditions or heavy use shortens lifespan.
Can I run the HVAC without a condensate pump?
You can only run without a pump if the system has a gravity drain or alternate routing. Running with a blocked or absent pump risks water overflow.
What causes the condensate pump to run constantly?
A stuck float, shorted float switch, or a leak feeding the reservoir can cause constant runs. Check the float action and inspect for continuous water input.

Frequently Asked Questions of Condensate Pump Troubleshooting
What are the first signs of a failing condensate pump?
Pooling water near the HVAC unit, frequent cycling, and error codes on the system are early signs. Act quickly to avoid damage.
How do I test a condensate pump float switch?
Turn off power, remove the pump cover, and gently lift the float while measuring for continuity or listening for the pump. If there is no signal or response, the switch is faulty.
Can I clean a condensate pump reservoir myself?
Yes. Turn off power, remove the pump, empty the reservoir, and clean with a mild detergent or vinegar solution. Rinse well before re-installing.
Is it safe to bypass a condensate pump float switch?
No. Bypassing the float switch risks overflow and water damage. Only replace or repair the switch to maintain safety features.
How much does it cost to replace a condensate pump?
Homeowner-grade pumps usually cost between $50 and $200. Professional replacement adds labor and ranges widely based on complexity.
What maintenance schedule should I follow?
Inspect and clean the pump and drain line every 3 to 6 months. Replace tubing and perform full checks annually for reliable performance.
Conclusion
Condensate Pump Troubleshooting is a manageable skill that prevents water damage and keeps HVAC systems running. Use the checklist, follow safety steps, and perform regular maintenance to avoid most failures. If a problem looks electrical or complex, call a trusted technician to ensure safe and code-compliant repairs. Try the simple checks today, and leave a comment or subscribe for more hands-on HVAC tips.

