
Most issues start with poor connections, weak batteries, or a faulty charger board.
I’ve fixed dozens of golf carts and chargers, so I know Ezgo 48 Volt Battery Charger Troubleshooting inside out. This guide walks you from quick checks to deep diagnostics. You will learn safe tests, common faults, step-by-step fixes, and when to replace or upgrade your charger. Read on to save time and keep your cart running.

Troubleshooting basics for Ezgo 48 Volt Battery Charger
Start with safety. Turn off the charger and cart before you touch anything. Wear eye protection and insulated gloves. A short or spark near batteries can hurt you.
Know what a healthy 48V pack looks like. A fully charged 48 volt lead-acid pack reads about 54–55 volts at rest. A resting voltage below 48 volts likely means the pack is discharged or a cell is weak.
Gather these tools before you begin:
- Multimeter with DC and AC ranges.
- Battery hydrometer for flooded cells.
- Basic hand tools and wire brush.
- Charger manual or wiring diagram.
A clear process helps. Check power first. Then connections. Then the charger output. Finally, test individual batteries. This order saves time and avoids needless repairs.
Common charger problems and symptoms
Below are the typical issues you’ll see when doing Ezgo 48 Volt Battery Charger Troubleshooting.
Charger won’t power up
- Symptom: No lights or fan noise.
- Likely causes: No AC input, blown fuse, bad cord, or internal fuse/trip.
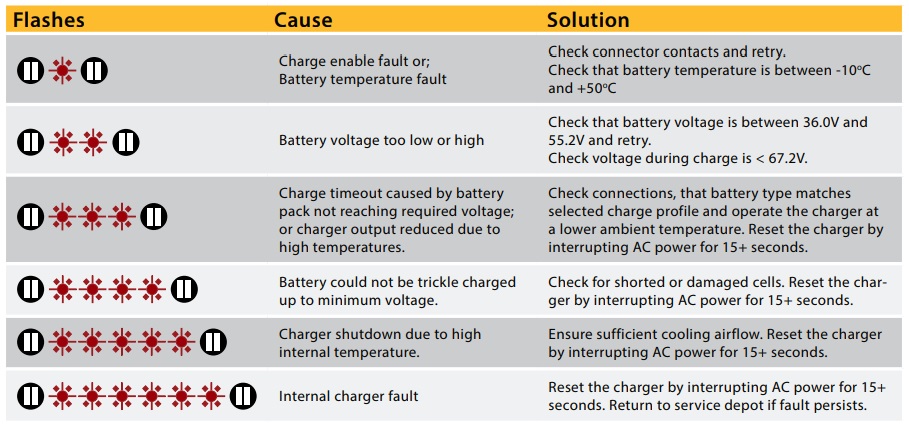
Charger shows fault LED or beeps
- Symptom: Flashing or solid error light.
- Likely causes: Over-temperature, battery not connected, reverse polarity, or internal fault.
Charger runs but battery won’t charge much
- Symptom: Charger on, low or no voltage increase.
- Likely causes: Weak battery bank, bad cell, high resistance connections.
Intermittent charging
- Symptom: Charge starts and stops.
- Likely causes: Loose connections, corroded terminals, or charger thermal cutouts.
Slow charging or long charge times
- Symptom: Takes much longer than normal to reach full voltage.
- Likely causes: Sulfation, very low cells, or undersized charger.
Strange behavior after replacement
- Symptom: New charger works briefly then fails.
- Likely causes: Wiring errors, ground faults, or remaining weak batteries pulling the charger down.
These patterns are common in Ezgo 48 Volt Battery Charger Troubleshooting. Recognize a symptom. Then test methodically. Avoid guessing.
Step-by-step diagnostic and repair guide
Follow this checklist for effective Ezgo 48 Volt Battery Charger Troubleshooting.
- Visual inspection
- Look for frayed cords, melted insulation, and corrosion.
- Check battery box for acid leaks and loose hold-downs.
- Verify AC power
- Plug charger into a known good outlet.
- Use a multimeter to confirm 110–120VAC (or 220VAC if your charger is that model) at the plug.
- Inspect fuses and breakers
- Check external fuses and breakers.
- Some chargers have internal fuses. If you find a blown internal fuse, note that internal failures often mean a larger issue.
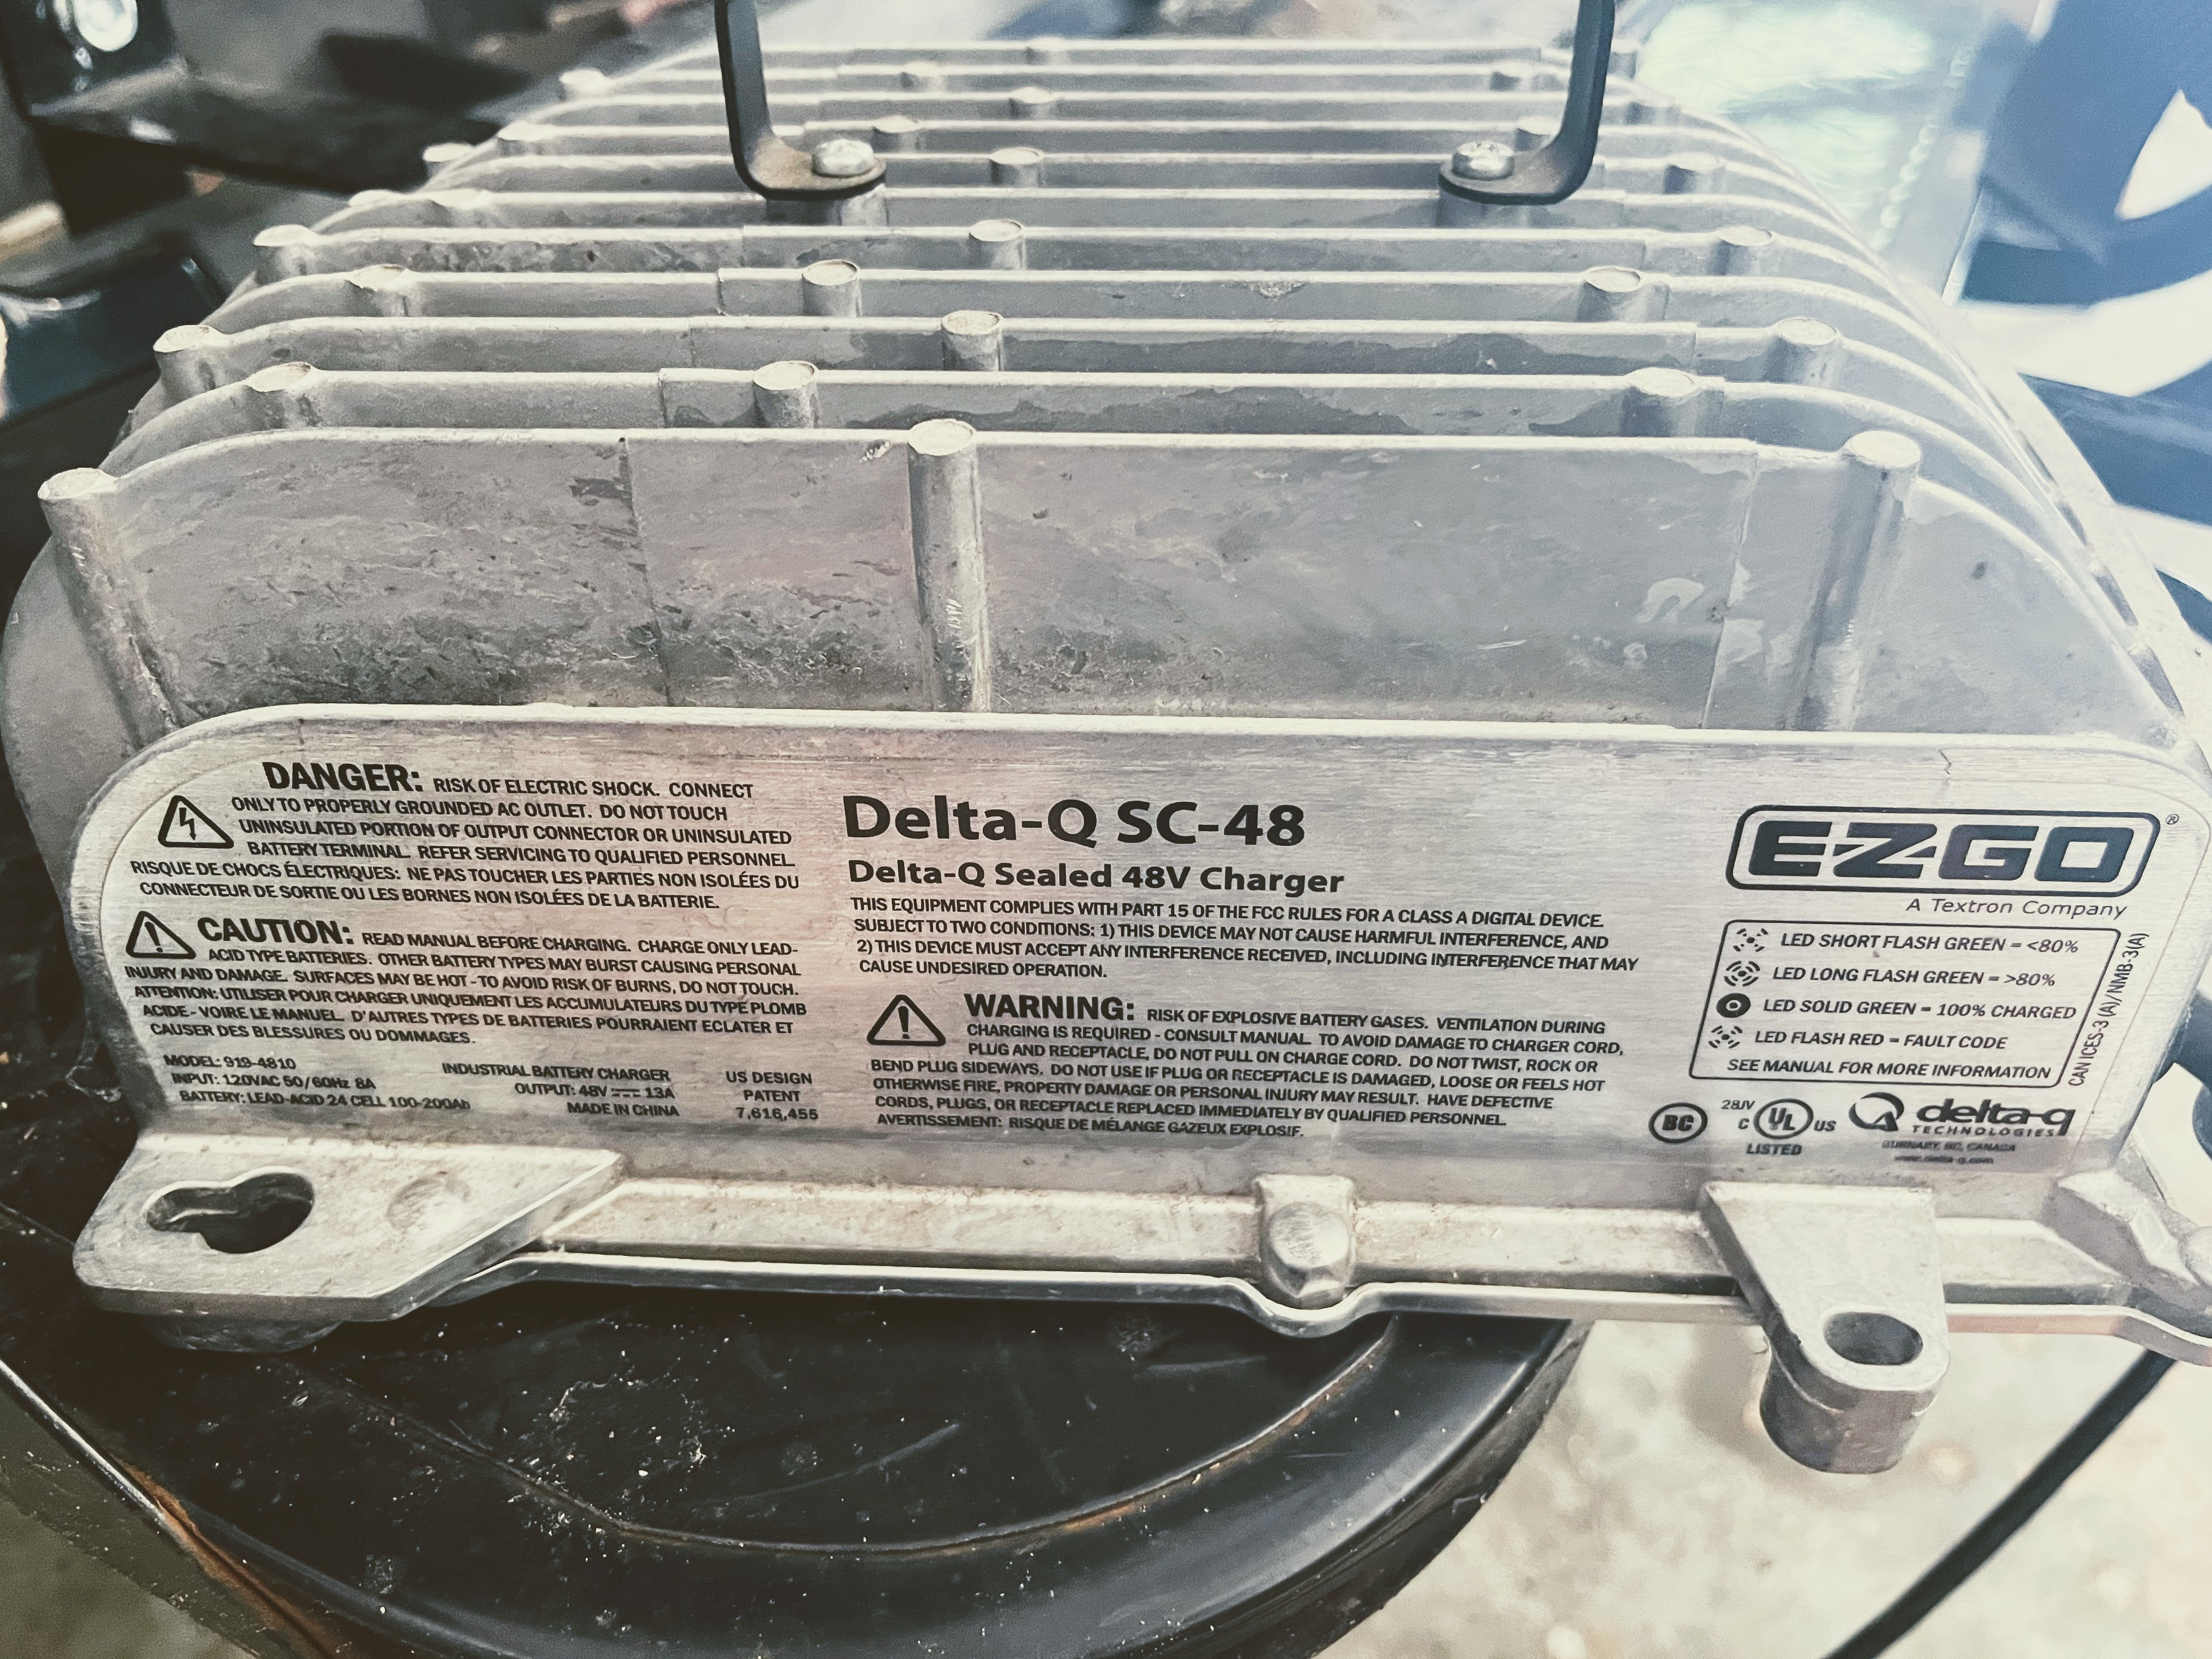
- Check basic charger LEDs and beeps
- Note LED patterns and cycles.
- Record the pattern for later reference or for a tech.
- Test charger output
- With charger on and connected to battery, measure DC voltage at the charger output.
- Expect around 54–58V during charge for 48V lead-acid systems. Lower readings suggest charger fault or heavy battery draw.
- Isolate battery issues
- Disconnect the charger from the pack and test each battery with a multimeter.
- Replace any battery that is significantly below the pack average or reads bad under load.
- Check connections and wiring
- Tighten terminal connections and clean corrosion with a wire brush.
- A 0.1–0.2V difference at a terminal can point to bad connections when multiplied across a pack.
- Load and float tests
- After cleaning and connecting, run the charger through a full charge cycle.
- Monitor voltage and specific gravity if you have flooded cells.
- When to call a pro
- Internal charger smells burned or visually damaged.
- You are not comfortable with high voltages inside the charger case.
I once troubleshot an Ezgo that wouldn’t charge. It was a single bad battery dragging the whole pack down. Replacing that one battery solved the problem and cost less than a new charger. That’s a common real-life lesson: test batteries before replacing the charger.
Preventive maintenance and battery care
Good maintenance makes Ezgo 48 Volt Battery Charger Troubleshooting rare. Follow these habits.
Weekly
- Check fluid levels in flooded batteries.
- Clean terminals and spray with a corrosion inhibitor.
Monthly
- Measure and record battery voltages after rest.
- Tighten cables and inspect charger cord.
Seasonal
- Perform a full equalization or maintenance charge if recommended.
- Store the cart on a charger maintainer during long idle periods.
Tips to extend battery life
- Avoid deep discharges below 50% regularly.
- Keep batteries charged after each use.
- Balance cells by equalizing periodically for lead-acid systems.
I recommend keeping a small log. Note charge times, voltages, and any faults. This data helps find slow failures before they become big problems.

Charger replacement, upgrades, and buying tips
When troubleshooting shows the charger is bad, decide whether to repair or replace. Consider these factors for Ezgo 48 Volt Battery Charger Troubleshooting.
Repair vs Replace
- Repair if the fault is a replaceable fuse, cable, or small component.
- Replace if the charger shows burnt electronics, repeated failure, or is obsolete.
Choosing a replacement
- Match voltage and amp output to your cart and battery type.
- Choose a charger designed for your battery chemistry: flooded lead-acid, AGM, gel, or lithium.
Features to look for
- Smart charging with temperature compensation.
- Built-in diagnostics and clear LED codes.
- Durable enclosures for outdoor use.
Installation basics
- Follow wiring diagrams and polarity markings.
- Mount in a ventilated and dry location.
- Use proper cable sizes and clean connections.
Upgrading
- Moving to a smart charger can increase battery life.
- Li-ion conversions require a charger and battery management system compatible with cart electronics.
I upgraded a fleet to smart chargers and saw fewer battery replacements. Upfront cost was higher, but total ownership cost dropped. That’s a strong reason to choose quality when replacing a charger.

Common questions while troubleshooting (PAA-style)
How can I tell if the charger or battery is bad?
Measure the charger output voltage with the battery connected and disconnected. If the charger output is correct with no load but the pack voltage drops under load, the battery bank likely has bad cells.
What voltage should a 48V Ezgo charger produce?
A fully charging 48V lead-acid system usually reaches 54–58V while charging. Resting voltage should be near 54–55V when fully charged.
Is it safe to charge a lithium pack with a lead-acid charger?
No. Lithium batteries need a charger and battery management system designed for lithium chemistry. Using a lead-acid charger can damage cells or create a fire risk.

Frequently Asked Questions of Ezgo 48 Volt Battery Charger Troubleshooting
What is the first thing to check when the charger won’t turn on?
Check the outlet and AC power. Then inspect the charger cord, plug, and any external fuses or breakers.
Why does the charger show an error light after a full charge?
An error light can indicate temperature issues, bad connections, or internal faults. Record the pattern and run basic tests on voltage and wiring.
Can a single weak battery stop the whole pack from charging?
Yes. One bad or low cell can pull the whole pack voltage down and prevent proper charging.
How often should I equalize my lead-acid batteries?
Equalize when the manufacturer recommends, typically every 30–90 days if needed. Overuse can harm batteries, so follow specs.
When should I replace the charger instead of batteries?
Replace the charger when diagnostics show constant charger faults, burned components, or when multiple chargers fail repeatedly. If batteries are healthy, the charger is likely at fault.
Conclusion
Ezgo 48 Volt Battery Charger Troubleshooting is mostly about order, simple tests, and good maintenance. Start with power and connections. Test chargers and batteries with a meter. Clean and tighten terminals. Replace parts only after you isolate the fault.
Take action today: check your charger and battery log. Make one small repair or cleaning step this week. If you found this guide useful, subscribe for more tips or leave a comment with your charging issue.

