
Most Sanyo TV problems fix with simple checks: power, cables, inputs, or firmware updates.
I’ve spent years repairing and troubleshooting TVs, and Sanyo TV Troubleshooting is a skill anyone can learn. This guide walks you through clear, step-by-step checks for power, picture, sound, remote, and smart features. You’ll get practical examples, safety tips, and real-world fixes that I’ve used in my own repairs. Read on to diagnose and fix Sanyo TV problems quickly and safely.
Common Sanyo TV Problems and Quick Causes
Sanyo TV Troubleshooting starts by recognizing common symptoms. Knowing likely causes saves time and prevents needless repairs.
- No power or TV won’t turn on. Usually a bad power strip, faulty outlet, or internal power board issue.
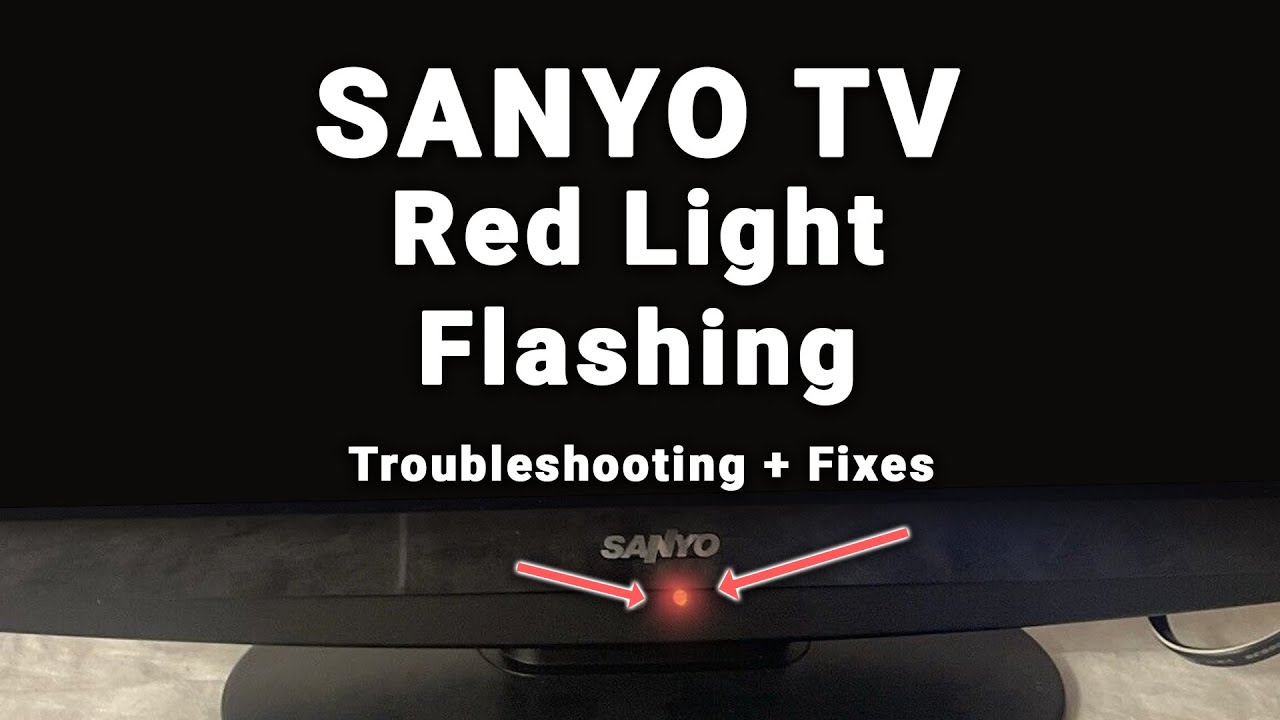
- Power LED blinks or flashes. Often a firmware fault, bad power supply, or protection mode triggered.
- No picture but sound plays. Commonly backlight failure or T-con/main board problems.
- Sound but no picture on specific inputs. Usually HDMI or input board issues.
- Remote not responding. Battery, pairing, or IR sensor fault.
- Smart features fail or apps crash. Network, firmware, or app compatibility issues.
Sanyo TV Troubleshooting begins with these observations. They guide targeted steps and reduce guesswork.

Safety First: Before You Start Troubleshooting
Always protect yourself and the TV. Safety prevents damage and keeps repairs legal.
- Unplug the TV before opening or touching internal parts.
- Work on a flat, stable surface.
- Use gloves and anti-static precautions if you plan to touch boards.
- If the TV is under warranty, check warranty terms before self-repair.
I once opened a TV without unplugging it and got a nasty shock. Learn from that: unplug first. Sanyo TV Troubleshooting must include safety at every step.
Step-by-Step Sanyo TV Troubleshooting Workflow
Follow a logical sequence. This order finds simple fixes first and avoids wasted effort.
- Visual and basic checks
- Ensure the TV is plugged into a known-good outlet.
- Try a different power cable or power strip.
- Check the power LED status and note blink patterns.
- Remote and control checks
- Replace batteries.
- Test buttons on the TV itself.
- Use a phone camera to see if the remote’s IR LED lights when a button is pressed.
- Input and source checks
- Cycle inputs (HDMI1, HDMI2, AV).
- Test a different source device (Blu-ray, game console).
- Swap HDMI cables.
- Picture and sound isolation
- Mute vs volume problems; test headphones if available.
- If sound but no picture, test with a flashlight to see if a faint image is present (backlight check).
- Network and smart features
- Reboot the router and TV.
- Test wired Ethernet if Wi‑Fi is flaky.
- Check for firmware updates.
- Factory reset as last resort
- Note settings and account logins before reset.
- Only perform if other steps fail.
This workflow makes Sanyo TV Troubleshooting systematic and efficient.
Power and No-Start Issues (Detailed)
Power problems are the most common. Fixes range from simple to technical.
- Check outlet and surge protector. Plug TV directly into the wall.
- Inspect the power cord for cuts or wear.
- Observe LED blinking. Count blinks and refer to the user manual for error codes.
- Try a power cycle: unplug for 60 seconds, press and hold power button on TV for 15 seconds, then plug back.
- If still dead, the internal power board or main board may fail.
Personal note: I replaced the power board on an old Sanyo after a storm fried components. The board swap fixed it for another five years. Sanyo TV Troubleshooting often boils down to diagnosing the power board.

Picture Problems: No Image, Lines, or Distortion
Picture faults can be scary but are often fixable.
- No picture but sound
- Shine a flashlight at the screen. If you see a faint image, the backlight or inverter is bad.
- If no image at all, the T-con or main board may be dead.
- Lines across the screen
- Check cable connections. Loose LVDS ribbon cables cause lines.
- Vertical lines often mean a panel or T-con fault.
- Color issues or oversaturation
- Check picture settings and test different inputs.
- Try a factory reset if settings don’t fix it.
I once fixed vertical lines by re-seating the T-con ribbon. It’s a small action that saved the panel.

Sound Problems and Speaker Issues
Sound complaints are common and usually easy to isolate.
- No sound at all
- Check mute, volume, and audio output settings.
- Test another source and input to rule out device issues.
- Distorted sound or buzz
- Check if distortion is present across inputs. If yes, internal speaker or audio board may be failing.
- External audio or ARC problems
- Update HDMI ARC settings and try a different HDMI cable.
- For soundbars, confirm ARC or optical settings match the TV output.
Sanyo TV Troubleshooting for audio often stops at reconfiguring settings or swapping cables.

Remote and Control Issues
Remote problems are simple but can be frustrating.
- Replace batteries first.
- Point remote at TV and press a button while looking at the TV’s IR receiver. Use a phone camera to see the IR light.
- Re-pair the remote if your model uses pairing or Bluetooth.
- If buttons on the TV work but remote does not, consider replacing the remote.
I keep spare remotes and universal remotes. For quick Sanyo TV Troubleshooting, a universal remote often proves the TV is fine.

Smart TV, Apps, and Connectivity
Smart features add complexity. Troubleshoot network first.
- Test wired connection if Wi‑Fi fails.
- Restart router and TV.
- Clear app cache or uninstall/reinstall apps.
- Check firmware updates for known app bugs.
- If streaming is choppy, test the internet speed and reduce resolution.
I fixed a Sanyo smart TV that kept crashing by updating its firmware. Firmware fixes can resolve tricky Sanyo TV Troubleshooting cases.

Firmware Updates and Software Fixes
Updating firmware can resolve bugs and improve stability.
- Check Settings > Support > Software Update (path varies by model).
- Use USB update if online update fails. Follow the exact file and folder structure required by Sanyo.
- Keep note of model number and current firmware before updating.
Warning: Interrupted firmware updates can brick the TV. Follow instructions carefully.
When to Repair vs Replace
Decide based on cost, age, and part availability.
- Small fixes: cables, remotes, firmware updates — repair.
- Moderate fixes: power board, T-con, speakers — repair if parts are affordable.
- Major fixes: cracked panel or multiple failing boards — consider replacement.
- Older TVs with outdated smart platforms might be better replaced if repair is costly.
I replaced a cracked panel once. The repair cost was higher than buying a new TV. Sanyo TV Troubleshooting includes cost-logic for smart decisions.
Parts, Tools, and Estimated Costs
Common parts and rough price ranges.
- Power board: $30–$120.
- T-con board: $20–$80.
- Remote: $10–$30.
- Screws and cables: $5–$20.
- Service call: $80–$200 depending on region.
Tools to have on hand.
- Screwdriver set.
- Multimeter for voltage checks.
- Anti-static wrist strap.
- Replacement cables and a spare remote.
These make Sanyo TV Troubleshooting simpler and safer.
Real-Life Examples and Lessons Learned
I once had a Sanyo TV that would turn on, blink, and then die. It was the power board. Replacing it fixed the issue. Another time a “no picture” problem was just a loose flat cable on the T-con board. Those small wins reinforce two lessons.
- Always check simple things first.
- Document model numbers and firmware when troubleshooting.
Those habits save time and money during Sanyo TV Troubleshooting.
Troubleshooting Checklist You Can Use
Use this quick checklist when diagnosing a Sanyo TV issue.
- Check power source and cable.
- Swap HDMI/input cables.
- Test with another source device.
- Replace remote batteries and test TV buttons.
- Reboot TV and router for network issues.
- Update firmware and apps.
- Inspect internal boards only if unplugged and safe.
- Consider professional service for panel or major board failure.
This checklist speeds up Sanyo TV Troubleshooting.
PAA-Style Questions (People Also Ask)
Q: Why won’t my Sanyo TV turn on but the power light is on?
A: If the LED is on but no screen, the backlight, T-con, or main board may be faulty. Try a hard reboot and test with different inputs.
Q: How do I update Sanyo TV firmware?
A: Go to Settings > Support > Software Update or use a USB method with the correct file. Follow model-specific steps and do not interrupt the update.
Q: What causes vertical lines on my Sanyo TV?
A: Loose ribbon cables or a failing T-con board usually cause lines. Reseating cables or replacing the T-con often fixes it.
Frequently Asked Questions of Sanyo TV Troubleshooting
What should I do if my Sanyo TV has no power?
Check the outlet and power cable, try another outlet, and test with a different power cord. If those fail, the internal power board may need inspection or replacement.
Why does my Sanyo TV show sound but no picture?
A faint image seen with a flashlight means the backlight is bad; no image suggests T-con or main board failure. Service may be needed for board or backlight replacement.
How can I reset my Sanyo TV to factory settings?
Navigate to Settings, then System or Support, and choose Factory Reset. Back up any settings and accounts before resetting.
Why is my Sanyo TV remote not working?
Start by replacing batteries, testing the IR LED with a phone camera, and re-pairing if needed. If problems remain, try a universal remote to isolate the issue.
Are firmware updates important for Sanyo TVs?
Yes. Firmware can fix bugs, improve security, and enhance apps. Update when stable releases are available and follow instructions carefully.
Conclusion
Sanyo TV Troubleshooting becomes easy when you follow a clear, step-by-step process. Start with simple checks like power and cables, move to inputs and settings, and only open the TV if you have the skills and tools. Use firmware updates and factory resets with care. If a repair costs more than a replacement or involves a cracked panel, replacing the TV is often the smarter choice. Try the checklist and tips here, and share your experience or questions below to get more tailored help.

