
Most Harley codes point to sensors, ignition, or fuel issues and need systematic checks.

Today's Exclusive Deals
Limited-time Exclusive Deals. Check current discount on Amazon.
Check Price on Amazon As an Amazon Associate I earn from qualifying purchases.I have spent years diagnosing Harley Davidson Troubleshooting Codes on shop floors and weekend rides. This guide explains how those codes work, how to read them, and practical steps to fix common faults. You will get clear definitions, real examples, safety tips, and a tested workflow to turn a cryptic fault code into a safe ride. Read on to master Harley Davidson Troubleshooting Codes with confidence.
Understanding Harley Davidson Troubleshooting Codes
Harley Davidson Troubleshooting Codes are alphanumeric messages generated by the bike’s electronic control module. They flag faults in sensors, ignition, fuel systems, and emissions controls. Codes help narrow down issues quickly and reduce guesswork.
Today's Exclusive Deals
Limited-time Exclusive Deals. Check current discount on Amazon.
Check Price on Amazon As an Amazon Associate I earn from qualifying purchases.Why these codes matter
- They save time by pointing at likely problem areas.
- They help techs and owners decide if a repair is simple or needs a shop.
- They keep safety high by calling out issues that affect rideability.
Types of codes you’ll see
- Active codes: problems currently present.
- History codes: past issues stored in memory.
- Pending codes: intermittent faults that may become active.
How codes are generated
Today's Exclusive Deals
Limited-time Exclusive Deals. Check current discount on Amazon.
Check Price on Amazon As an Amazon Associate I earn from qualifying purchases.- Sensors compare measured values to expected ranges.
- The ECU logs differences and stores a code when thresholds are exceeded.
Harley Davidson Troubleshooting Codes are part of a broader diagnostic system on modern bikes. Knowing how to read and interpret them is half the repair.

How to Read and Retrieve Codes
You can retrieve Harley Davidson Troubleshooting Codes several ways. Use the method that fits your model year and tools.
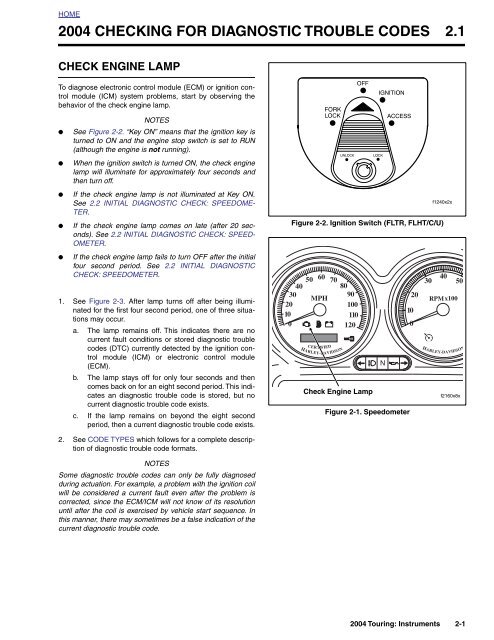
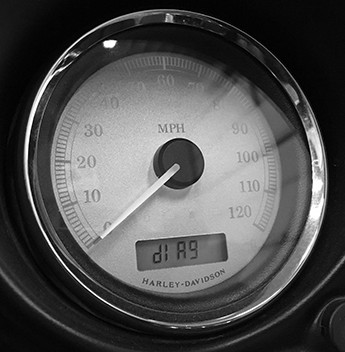
Built-in dash readout
- Some models show codes on the instrument cluster.
- Follow your owner manual to cycle the display to diagnostic mode.
Hand-held code readers
- Use an OBD-II or manufacturer-specific scanner for later models.
- Plug into the diagnostic port and read stored codes and freeze-frame data.
Shop-grade diagnostic tools
- Dealer tools give live data, component tests, and guided troubleshooting.
- These reveal sensor values, fuel trims, and ignition timing data.
Manual flash and LED methods
- Older Harleys use LED blink codes from the ECM.
- Count blinks carefully; the pattern maps to a specific code.
Tips for accurate reads
- Record both active and history codes.
- Clear codes only after verifying the issue; use a short test ride after fixes.
Harley Davidson Troubleshooting Codes become useful only when read correctly and tied to live data.
Common Codes, Causes, and Fixes
Below are common Harley Davidson Troubleshooting Codes grouped by system. Each entry gives causes and practical fixes.
Ignition and spark issues
- Symptom: Misfire, poor throttle response.
- Common codes: Ignition misfire or coil circuit faults.
- Causes: Bad coil, faulty plug, damaged wiring, bad trigger sensor.
- Fixes: Swap coils to isolate bad unit, inspect wiring, replace plugs.
Fuel and injection codes
- Symptom: Hard starting, stumbling, low power.
- Common codes: Injector circuit fault, fuel pressure low.
- Causes: Clogged injector, weak pump, sensor failure.
- Fixes: Check fuel pressure, clean or replace injector, verify pump operation.
Air and sensor codes
- Symptom: Rough idle, irregular throttle.
- Common codes: MAF/TP sensor faults, MAP discrepancies.
- Causes: Dirty sensor, vacuum leak, wiring issues.
- Fixes: Clean sensors, test vacuum lines, repair harness.
Emission control and EVAP codes
- Symptom: Smell of fuel, check-engine light stays on.
- Common codes: EVAP leak, purge solenoid failure.
- Causes: Loose cap, cracked hose, faulty solenoid.
- Fixes: Tighten or replace cap, replace hoses, test solenoid.
Charging and electrical codes
- Symptom: Weak lights, dying battery.
- Common codes: Regulator/rectifier fault, stator issues.
- Causes: Worn stator, bad regulator, poor ground.
- Fixes: Test charging output, replace faulty parts, check grounds.
PAA-style questions (People Also Ask)
- How do I reset Harley Davidson Troubleshooting Codes?
- Use a scanner or the dash menu to clear codes after repair. If codes return, further testing is needed.
- Can I ride with a stored code?
- Minor history codes are sometimes safe, but active safety or ignition codes should be fixed before riding.
- What tool reads Harley Davidson Troubleshooting Codes best?
- A manufacturer-level scanner or a quality OBD-II tool with motorcycle support gives the clearest data.
These examples cover frequent issues I encountered in the shop and on long rides. Always confirm with live data before replacing parts.

Troubleshooting Workflow: Step-by-Step
A repeatable workflow reduces errors and wasted parts. Use this checklist every time you see a code.
- Record and document
- Write down all active and history Harley Davidson Troubleshooting Codes.
- Note recent symptoms and environmental conditions.
- Gather live data
- Use a scanner to view sensor values at idle and under load.
- Check voltage, fuel pressure, and ignition timing as relevant.
- Inspect physically
- Look for damaged wiring, loose connectors, and fluid leaks.
- Wiggle harnesses while observing live data for changes.
- Isolate components
- Swap parts when possible (coils, injectors) to confirm faults.
- Use known-good parts or bench-test suspect parts.
- Repair and verify
- Fix wiring, replace failed sensors, or perform needed mechanical repairs.
- Clear codes, perform a test ride, and re-scan to ensure codes do not return.
- Log the outcome
- Record repairs and code history for future reference.
Following steps like this saved me hours and parts. I once replaced a coil only to find a chafed wire—documenting and testing would have revealed the true issue earlier.
Tools and Equipment You Need
A small, focused kit will handle most troubleshooting tasks for Harley Davidson Troubleshooting Codes.
Essential tools
- OBD-II or Harley-compatible scanner for code reads.
- Multimeter for voltage and continuity checks.
- Fuel pressure gauge for injection system checks.
- Basic hand tools for access.
Optional but helpful
- Shop manual or service software for wiring diagrams.
- Oscilloscope for advanced sensor checks.
- Battery tender for charging system tests.
Tool tips from experience
- A good scanner that shows live data beats guessing.
- Keep a set of spare plugs and fuses for quick swaps.
Having the right tools makes Harley Davidson Troubleshooting Codes actionable rather than cryptic.

Best Practices and Safety
Work smart and safe when troubleshooting. Small mistakes can cause bigger problems.
Safety checklist
- Disconnect battery when working on major electrical work.
- Use eye protection and gloves when needed.
- Secure the bike on a stable stand for under-bike work.
Documentation and conservative repairs
- Always compare to factory specs before replacing parts.
- Replace only items verified by data or isolation testing.
When to get professional help
- Complex electrical issues and airbag/ABS faults need trained techs.
- If you lack tools like an oscilloscope or dealer software, see a shop.
Being cautious prevents mistakes I used to make early in my career, like replacing a perfectly good regulator without checking connections first. Short tests and careful checks save money and time.

Personal Experience and Tips
I’ve diagnosed hundreds of Harley Davidson Troubleshooting Codes over a decade. Here are real tips from the bay.
Practical tips that helped me
- When codes point to coils, swap coils between cylinders to confirm.
- For intermittent sensors, tap connectors while viewing live data to reveal faults.
- Keep a photo log of connector positions before unplugging.
Common mistakes to avoid
- Replacing parts based solely on code without data verification.
- Clearing codes and assuming the problem is gone.
- Ignoring simple items like loose battery terminals and poor grounds.
A quick story
- I once chased a fuel injector code for hours. The fault was a cracked vacuum line causing false sensor readings. Fixing the line solved the issue and taught me to inspect basics first.
These lessons come from hands-on work and will save you frustration.

People Also Ask — Quick Answers
What causes a persistent check-engine light on a Harley?
- Persistent lights usually mean an active fault. Check stored Harley Davidson Troubleshooting Codes, view live data, and inspect sensors and wiring.
Can a bad battery trigger other codes?
- Yes. Low voltage can cause multiple sensors to report faults. Test charging and battery health early in diagnostics.
How often should I scan my Harley for codes?
- Scan after any odd behavior, after maintenance, and during routine service checks. Regular scans catch issues early.
Are dealer tools necessary for all models?
- Dealer tools provide the deepest data but are not always required. Quality aftermarket scanners can handle many Harley Davidson Troubleshooting Codes.
Is it safe to clear codes without fixing the problem?
- Clearing codes hides the symptom. Codes that return indicate unresolved issues and should be fixed before extended riding.
Frequently Asked Questions of Harley Davidson Troubleshooting Codes
How do I retrieve Harley Davidson Troubleshooting Codes from older models?
Older models often use an LED blink method or dash sequence. Follow the owner manual to enter diagnostic mode and count blink patterns to map codes.
Can aftermarket tuners cause troubleshooting codes?
Yes. Aftermarket tuners can change sensor thresholds and trigger Harley Davidson Troubleshooting Codes if the tune is not calibrated properly for sensors or hardware.
What if a code clears but symptoms remain?
If a code clears and symptoms remain, the fault is likely intermittent or mechanical. Re-scan after a test ride and focus on live data for diagnosis.
Do I need a dealer to fix ABS or airbag-related codes?
Complex systems like ABS may require dealer-level tools and procedures. Minor checks can be done at home, but advanced diagnostics often need professional equipment.
How long do history codes stay in the system?
History codes persist until cleared or overwritten by new faults. They help track intermittent issues over multiple rides and should be reviewed during diagnostics.
Conclusion
Harley Davidson Troubleshooting Codes are powerful tools when you know how to read and act on them. Use the step-by-step workflow, rely on live data, and trust simple inspections before replacing parts. Start small: scan, document, test, repair, and verify. Take action today by scanning your bike, making one small fix, and logging the results. Share your experiences or ask a question below to keep learning and ride safer.


